Help! – The Beatles
At some point in your guitar life, and pardon the pun, you’re going to have to come to grips with barre chords. If you play acoustic guitar, the thought of barre chords can scare you silly. But they, pretty much like everything concerning the guitar (and music), are just another skill that you’ll develop with time. Like anything, the more you practice them, the more confidence you’ll have.
I have to admit, though, I personally tend to avoid barre chords for the most part. My first guitar was a twelve-string and I have smallish hands, so I learned a lot of ways of getting around these somewhat dreaded chords. My fear of barre chords is probably one of the major reasons that I know so many different chord voicings and chord substitutions that I do. Not to mention giving me a lot of practice with capoing and transposing in my head!
So let’s take a song that uses a few barre chords, maybe two, three tops, and work out a lesson. And, to give you a sporting chance, we’ll use a song where you can cheat around the barre chords while you’re learning them. After all, we want to play, right?
These files are the author’s own work and represent his interpretation of this song. They are intended solely for private study, scholarship or research.
This lesson’s song in question is Help! by the Beatles. In addition to working with barre chords, we’ll also take our usual look at the nuances of single guitar arrangements, as well as learning a nifty little guitar riff. And, just to be a total pain, how about a walking bass line, albeit a very tiny one? Oh yes, we might also learn a thing or two about music and music theory and how it all pertains to the guitar. Some habits die hard, I guess. Anyway, let’s get started, shall we?
Verses, Chords and Strumming (in some order)
Help! is structured in the following manner: it begins with an introduction and then goes into the first verse, followed by the chorus. The chorus, as we’ll see, is simply a variation of the introduction. After the first verse and chorus comes the second verse (with chorus) and then a repetition of the first verse (again, with chorus). Finally, there is a short outro to end the song.
The key of the original recording is A major. The verses are made up of two eight-measure phrases, using the chord progression of A (two measures), C#m (two measures), F#m (two measures), D (two beats), G (two beats), and A again (one measure). This eight measure phrase is repeated to make up the second half of the verse.
Before we get to the chords, let’s take a look at the strumming. If you listen to the original recording, you’ll hear John Lennon’s acoustic guitar playing not one single strumming pattern, but rather numerous variations of what could be considered a single pattern. Here are some of the rhythms he uses (and please notice that I’m using “slash” notation to mark out the rhythm – that way you don’t have to get confused by reading lots of notes!):
As you can see (and hear), these various patterns have similarities, but are definitely different. For the most part, the first two beats of any given measure are quarter note downstrokes while the remaining two beats are some combination of quarter notes, eighth notes, ties or rests. The song certainly doesn’t suffer from not having one strict strumming pattern. To the contrary, it sounds organic and lively.
What you might want to do at this stage is to get comfortable playing any of these rhythms that appeal to you. Then work at combining different ones, to the point that you’re not even thinking about switching from one to another. I know it sounds a bit like voodoo, but you want to get so that these variations in patterns just happen seemingly by their own accord.
Since these four examples are each two measures long, another thought would be to “splice” them together differently. For instance, follow the first measure of “Pattern 1” with the second measure of “Pattern 3” or the second measure of “Pattern 4.” You can see you’ve got a lot of choices.
An even further test is to see if you can play any combination of these rhythms while holding a conversation. If so, then you’re well on your way to being able to sing and play at the same time.
A quick note before we move on to the chords: one variation that you might find very helpful, not only here in Help! but with other songs as well, is to try out a “bass/strum” style. That is, you’d hit the root note of the chord you’re playing on the first beat instead of the full chord, as in this example:
It may seem like a small thing but, as you’ll find when we look at some of these chords in a moment, playing in this style can buy you a moment or two to get the rest of your chord in place. It never hurts to think about these things! And it will be very important when dealing with the barre chords we’ll be using. This particular pattern, by the way, you’ll hear a lot in the MP3 examples. It seemed to be a “default” setting for my strumming when I was recording this lesson…
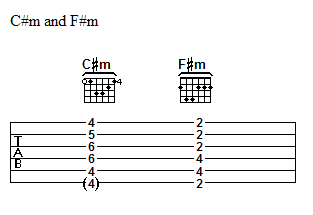
Okay, on to our chords. As I noted earlier, in the verses we’ve got A, C#m, F#m, D and G. On the original recording, C#m and F#m are played as full barre chords, like this:
Even if you’ve never made a barre chord in your life, you hopefully will recognize these chord shapes (and if you want to read more on chord shapes and learn where they come from, check out this old guitar column: But Then Again…). And if you don’t, don’t worry. That’s why we’re here!
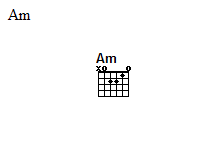
Let’s start by making an open position Am chord, like this:
If you’re like most people, you’ve got your index finger on the first fret of the B string, your ring finger on the second fret of the G and your middle finger sitting on the second fret of the D string. Are we good with that?
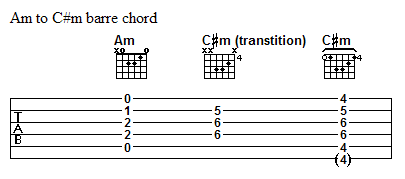
What we want to do next is to rearrange our fingering of this chord so that we aren’t using our index finger. So, the middle finger replaces the index finger at the first fret of the B string and your pinky takes the ring finger’s former position (the second fret of the G string) so that the ring finger can place itself on the second fret of the D string. With this fingering, your index finger is totally free. And that will allow it to perform the barre for the barre chord. Are you ready?
There are essential two ways to go about this and we’re going to want to look at both, for reasons that will hopefully become obvious. I’d like to suggest that you start with the Am chord and move it up the neck until your fingers are sitting in the fifth and sixth frets and then place your index finger across the strings at the fourth fret. That placement of the index finger is the “barre.” Here’s a breakdown:
In essence, what we’ve done is to move the Am chord four frets up the neck. Each fret is one half-step higher in pitch, so when we moved up one fret we moved the Am chord to A#m (also called Bbm). Two frets higher up the neck we had Bm (which we’re going to need very shortly), three frets higher we had Cm and now that we’re four frets up we’ve got C#m.
A couple of things you want to remember about barring – first off, this is going to be new, so give yourself time to get it. Most people, especially on acoustic guitars, need quite a bit of practice before they feel even slightly comfortable with making a barre chord.
Secondly, with this particular shape where the root note (C#) is on the fifth (A) string, you really only need to get the tip of your index finger onto the string. A typical beginner approach is to get as much of the index finger to cover the barre as possible, usually jamming the neck of the guitar totally into the little webbing between one’s index finger and thumb. There’s simply no way you’ll be able to finger the rest of the chord if the tip of your index finger is way beyond the sixth (low E) string.
Third, as impossible as this is going to sound, relax! Even though we want, ideally, to be able to strum each string and get a clean, clear note, you actually don’t need to turn your index finger and thumb into a vice that has a death grip on the neck of your guitar. Experiment a bit and see just how much pressure you do need and then work on relaxing even more. It’s about finger placement, and that’s part of the paradox – the goal is, obviously, to lay your index finger flat across the strings. But if you take a look at your index finger, and it doesn’t have to be that close of a look, the chances are likely that it’s far from flat. So your initial concern is going to be finding the “sweet spot” for your finger. And that sweet spot is likely to change depending on the type of barre chord you’re playing.
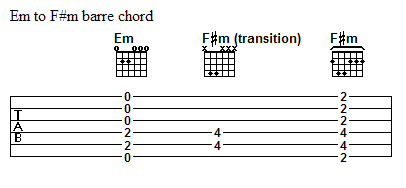
Once you’re somewhat comfortable with the C#m, let’s try to form an F#m. We’ll use the same steps, only this time we’ll start with an Em chord and then move it up two frets on the neck like this:
For this, you may find it a lot easier to use your ring and pinky fingers, leaving your middle finger free to tell your teacher what you think of this exercise. When your F#m chord is in place, the pinky will be on the fourth fret of the D string and the ring finger will be on the fourth fret of the A string.
Many people find a “root six” barre chord (where the root note, F# in this case, is played on the sixth (low E) string) easier than a “root five” barre chord, such as the C#m we just played. For some it’s just the opposite. Regardless, you’re eventually going to want to do both so why not get started now? Again, relax and take your time to get the chord so that you can play all the strings with a reasonable amount of comfort and clarity.
Now, believe it or not, comes the harder part, changing between chords. In order to do that, we’re going to change our philosophy a bit in regard to barre chords. So far, we’ve managed to make barre chords by getting the other fingers in place first. The main reason I had you do this was to get the feel of how the chord should be, to gain some confidence that you can make these chords and make them with a relative sense of ease.
To take this one step further, we now want to form the barre chords we’ve learned by laying down the index finger first. For the C#m, place your index finger in its barre position on the fourth fret and then get the other three fingers into the Am chord shape. On the F#m, you’ll want to get your index finger set on the second fret first, before adding the ring and pinky fingers to complete the chord.
You should find that the work you’ve done in setting up the barre chord is making it easier for you to get it in place in this “index finger first” fashion. You’ll also find that making the barre chord in this way, particularly if you’re going to be hitting the bass note before the rest of the chord, as in Example 3 (told you it pays to think ahead) will buy you an extra fraction of a heartbeat, which will help you to get all of the chord in place for the full chord strum on the second beat.
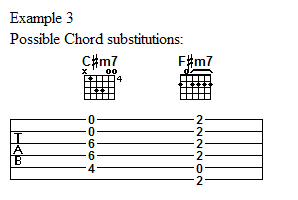
And now that you’ve got something to work on, let’s also make things a little easier for you by giving you a “barre-chord free” option. Many times when a song calls for a minor chord, the minor seventh can be used as a substitute. And, as luck would have it, there are relatively easy fingerings for C#m7 and F#m7, as you can see here:
The C#m7 is especially interesting, as it’s pretty much a C#5, or a C# power chord if you will, but played across all five strings, from the A string down toward the floor. The open E string is what makes this chord minor, while the open B string provides the seventh.
This version of F#m7 might be familiar to those of you who’ve read the Nowhere Man lesson. Basically, it’s a “one finger” barre chord, but you can also use your thumb to get the bass note (F#) at the second fret of the low E (sixth) string.
Alright then, now that we have our chords and some ideas about strumming, let’s put together a verse:
As we’ve been discussing, the hardest part about playing this is going to be making the chord changes from A to C#m to F#m. You want to practice this by starting out painfully slowly, at a tempo slightly slower than, say, tectonic plate movement, but slightly faster than the brains of most people’s when given the chance to not say incredibly silly or vapid things on the Internet. I’m certain you’re dead tired of my telling you that patience is key, that you’ll get faster with practice and clean repetition, so let’s just pretend that I’ve told you that, okay?
Help! is played at a fairly brisk pace on the original recording. I’ve heard many covers done in many different styles and tempos, so don’t worry about tearing along at speed until you’ve gotten comfortable making the changes between chords.
Introduction Riff, Chorus and Outro
I recall promising you a walking bass line…
The introduction and the choruses of Help! include two vital bits that we might think of as “signature riffs.” The first is actually a very short walking bass line, first from the B root note of Bm (second fret of the A string) to G (third fret of the low E (sixth) string) and then from G to the open low E. Before we get to that, though, let’s take a quick look at Bm:
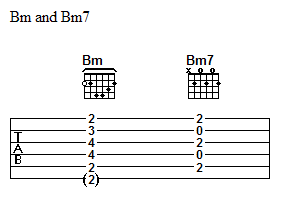
The Bm is a carbon copy of the C#m barre chord, only our barre is on the second fret instead of at the fourth. And our other fingers are positioned accordingly, middle finger on the third fret of the G, pinky on the fourth fret of the D and ring finger on the fourth fret of the A string.
Because hitting this root note is vital to the signature riff, we don’t want to use any of our beginners’ substitutes for Bm, such as XX0432 or XX4432, because neither gives us that root note (again, second fret of the A string) to work off of. So many people might want to use the Bm7 shown in this example. But give the Bm barre chord your full attention, okay, and only use this substitution if your fingers are so sore they can’t barre anymore!
And since that’s taken care of, let’s look at the descending bass line used in the introduction:
You’ll note that I’ve simplified the rhythm a touch in order to concentrate on getting the timing of the bass notes clean and right on the first and third beats of the second measure of both the Bm and the G chords. The very cool thing you may discover about playing a full Bm chord is that you only have to raise your index finger off the barre to get the open A string. Be careful not to strum all the way down to the open high E (first) string and you should be okay.
The walk from G to Em, via the F# note at the second fret of the low E (sixth) string, is something we’ve done in numerous lessons by now, so hopefully it won’t take you too long to get it back up to speed.
After two measures of E7 (please note that I’m using an open E7 chord here – 020100 – and that many transcriptions use a full open position E – 022100 – either choice is fine), we come to the much fancier signature riff, which is this:
I call this an “A9” riff because, in essence, we’re playing the open G and open B strings on top of an A chord. This is one of those instances where guitar players might want each of the chords spelled out, but it makes absolutely no sense to do so. The first notes on the A and D strings, respectively, are E (seventh fret of the A) and G (fifth fret of the D). That’s part of an A7 chord and many transcriptions will note that an A7 chord is played underneath this riff. But the droning of the B string definitely makes it an A9.
What you want to do is to move up the neck from your E7 chord, placing your index finger on the fifth fret of the D string and your ring finger on the seventh fret of the A string. Play an arpeggio, picking the A, D, G and B strings in order and then shift your fingers down one fret (ring finger on the sixth fret of the A and index on the fourth fret of the D). Play the resulting arpeggio again and slide your fingers down one fret once more. You’ll keep this up until you get to the fourth and second frets.
Like the barre chords, this is going to take some practice. It’s important to keep the rhythm of these eighth notes smooth and even (and not play them like I do sometimes in the final MP3!) and that will take some effort on your part. Plus, you want to practice getting to this riff from the E7 and then “landing” yourself back on the A chord that starts the first verse.
The reason all this is important is because you’re going to run into both the descending bass line and the “A9 riff” in each chorus:
As you can see (and hear), the chorus is pretty much a “drawn out” version of the introduction. Instead of two measures of Bm, G and E7, there are four measures of each, with the appropriate walking bass line taking place in the fourth measure of the Bm and G chords. Shouldn’t be a problem at all.
It’s important to notice that there are also two measures of A immediately following the “A9 riff.” These start on the word “me” in the final “help me” of the chorus. The outro is essential a small change to these last two measures of A in the chorus, plus a bit of an addition. If we look at the last chorus, starting with the “A9 riff,” we see:
You can see that we’ve got the “A9 riff” going and leading into an A chord for one measure instead of two. This measure is followed by a measure of F#m. And this particular measure is one place where you might find the substitution of F#m7 to be very helpful, because of what’s going to happen next.
Actually what happens here, in this arrangement of Help! is different than the original recording. In the penultimate measure, I opt to use a different voicing of the A chord, one (sneakily enough) that also uses the “single finger barre” that we can use to play the F#m7. Using the index finger to cover the four highest strings, I add my pinky to the fifth fret of the high E (sixth) string. This voicing of A is used quite frequently in classical music, as well as being a favorite voicing of Pete Townsend’s (you can hear it, for example, in The Seeker as well as in the Who classic, Won’t Get Fooled Again). I strum from the A string down, using this voicing, then pull off the index finger to get the F# note at the second fret and then strum once more, replacing my pinky on the fifth fret of the B string to get the E note. Here it’s important to stop the strum at the B string, otherwise I’d get the F# note again and I want to save that for the very last chord, A6.
Those of you with quick eyes and minds will notice that the A6 has the same fingering as the F#m7, except that A is now the root note. We could, if we choose to do so, argue that they are the same chord, after all they have the same notes. And we could argue that the A6 is simply an inversion of the F#m7. Or we could simply roll our eyes and get on with playing the whole song:
I hope that you’ll truly forgive the big breakdown in the playing at the end of this last MP3. I could blame it on the writing and recording this under the influence of a lot of allergies and congestion and sore throat. Hopefully, I’ll get a chance to redo it very, very soon.
And I also hope you’ve had fun with this lesson and are ready and willing to get going on playing songs with barre chords. They can definitely add a different voicing to a chord and also give a lot of “oomph” to your playing and the sooner you get comfortable using them, the sooner you’ll be using them without thinking about it.
Until our next lesson…
Peace
