The Mix Board
“You bwow in here, and it goes awound, and awound, and awound… and comes out here.”
(Elmer Fudd explaining the Tuba)
“Excuse me, I’m with the band.”
“Oh, what instrument do you play?”
“The slide-pots.”
“That’ll be 5 bucks buddy.”
(an actual conversation at the door of a bar in Chicago)
Overview
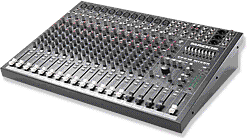
When you first see a mix board, it can be overwhelming. A 16 channel board can have over 200 knobs, buttons, sliders, and lights. Even when you break it into groups, you can have 10 controls for each input, and a bunch more for various group sends and receives. Most modern boards are designed to be so flexible that it can be confusing to figure out how to do what you need to do.
In this article, I will try to describe each section of the board, what it does, and what your options are. It will help a lot to have a mix board to look at while you review this.
The normal path of a vocal signal is: microphone to cable to mix board to EQ to amplifier to cable to speaker.
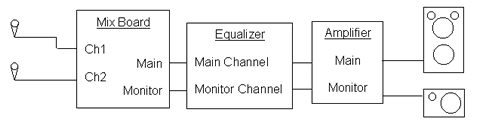
But all of the action is in the mix board. The path of that signal inside the mix board is: input connector to pre-amp to tone controls to individual fader to group fader to main fader to system EQ to output connector. Plus there are usually at least two branch points for monitors and effects. You’d think the signal would either get tired or lost!
One early trick is to avoid unintentional feedback. Screaming feedback is a sure sign that you are either a novice or you don’t care about your audience and equipment. (I’ll also discuss the uses for intentional feedback) Keep the volume down while you are setting up and testing.
Note: I am a working electronics engineer, and I have built or repaired many of the electronics that will be discussed here. I will try not to get too technical, but if you end up confused or curious, please email me and I’ll try to help.
The Layout
A typical mix board has a row of input connectors on the left side of the back panel, usually each input channel has one 3-pin XLR input for mics and one ¼” input for guitars or keyboards. On the right side of the back panel are the main outputs as well as many of the accessory inputs and outputs.
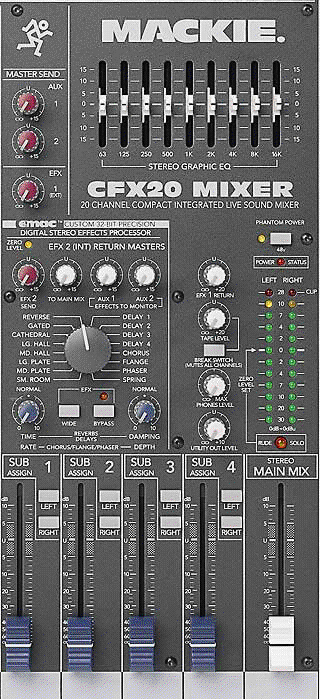
From the front, starting on the left, there will be one “slot” for each input channel. Each slot will be identical to the next. On the right side will be the main output controls, as well as controls for the accessory inputs and outputs. Typically, there will be a display that shows you how much signal (how loud) is going out. The displays tend to reside on the right or across the top. Some boards have a “group mixing” section between the main controls and the individual channel controls.

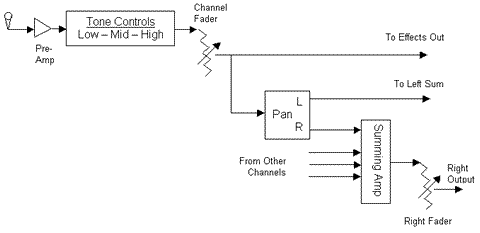
The Pre-Amp
A good quality low-impedance microphone converts the moving air from your voice into very small electrical signals (measured in microvolts). These signals need to be amplified to a higher level so that noise from the processing electronics doesn’t overwhelm the original signal. A good mix board will use special low-noise electronics to boost the mic signal up into the 1-3 volt range. The amount of boost is called “gain”. Every stage after the pre-amp adds more noise, so you want to get the most out of the pre-amp that you can. There is usually a gain control (labeled GAIN) at the top of each slot. You want to get the most gain from the pre-amp without overloading – “clipping”. If you are lucky, there will be an LED labeled “CLIP” or “PEAK”. This LED indicates that the pre-amp has been overloaded, and distortion is being created. If this ever blinks red, turn down the gain. Any distortion introduced in the pre-amp stage is with you forever, so avoid it at all costs.
The Tone Controls
Some mixers call this EQ, because it sounds cool, and it uses fewer letters. But the controls labeled HI, MID, and LOW are really tone controls. You use these to adjust the sound of individual instruments or voices. In general, turn the HI and LOW down a little, and leave the MID alone. If you have a singer with an ethereal voice, then you might want to boost the HI and cut the LOW some more. (The Beach Boys do this in concert to try and make their 50+ year old voices sound like under-20.)
If you have a parametric tone control for the MID, then you can use this to create an effect. For example, at our middle school plays, we use this to give the kids a pseudo-adult voice by significantly boosting the low end of the MID. But in general, leave the MID alone (eg set at 12-noon).
Do not use the tone controls to control feedback, unless you are sure that only one mic is causing the problem, and then turn down the HI for only that channel. But I’d try other methods first, which we’ll cover in a later article.
The Pan Pot
This control allows you to send a different amount of signal to the Left and Right channel of the board. Since I am not a fan of stereo for live bar gigs, leave this set in the middle for now. Later I’ll teach some tricks on how to use the pan pot for other things.
The Fader
Each channel has a fader, either rotary of slide (I much prefer slide). This determines how much of this particular channel’s signal goes into the main mix. For most situations, you will want to set this at the “0-level” marked on the board. You should rarely have to change this level, except for when individuals change roles (eg lead vs back-up singer). Always turn off (slide the pot to the bottom) any unused channels to reduce stage noise, etc.
The Group Faders
In the simplest case, there will either be a Left and Right fader, or just a Main fader. All of the incoming signals are joined (mixed) together electronically prior to reaching these group faders. These faders simply control the overall level going out to the amplifier.
Some boards have 4 or more group faders and a set of buttons that determine how to assign each input channel to a different group. This is good when you have a many channels which can be logically grouped together (eg all the drum mics, all the back up singers).
Most boards will have an output for each group, which can be useful for adding reverb and other effects, but the one that you want for now is the “MAIN” or “SUM” output, which combines the Left and Right signals together. If you don’t have a summed output, then use just the Left output for your main PA.
The First Test
First, turn down all of the accessory input and output levels. You don’t want to be confused by them – yet.
Plug a microphone into one of the channel inputs. Do not plug in an amplifier to the Main output yet. Set the GAIN to halfway. Set the channel fader to 0-level, and set the Left/Right/Main fader(s) to 0-level as well. Talk into the microphone. Notice which display lights come on, and what colors they are. Obviously red is bad. Keep talking and turn up the GAIN until the CLIP light blinks (if you don’t have a CLIP light, we’ll do it again by ear later), then turn it down until it stops. Now shout into the mic and turn it down some more if the CLIP blinks. Now check the Left/Right/Main level displays. Normal talking should be in the green or low yellow. A shout should light up the yellow, any maybe one red, but no more.
Second Test
Turn the Main faders down and connect an amplifier and speaker. Place the speaker about 5 feet away, facing you. If there is an input volume control on the amplifier, turn this down to about 25%, we don’t need to be loud for this test. If you have a boom box, place it facing away from you as far away as possible with the mic in front of it (not near the PA speaker – other side!), and play some music at a moderately loud level.
With all of the setting as above, slowly increase the Main faders until you can hear the music from the boom box coming out of the PA speaker. Adjust it until the level is comfortable. Play with the Tone Controls to see what effect they have.
For the next step, you need both hands. Place one hand on the GAIN knob, and the other on the channel fader. Slowly increase the GAIN while decreasing the channel level to keep the volume constant. At some point, the CLIP light should blink red, and you should be able to hear the distortion. It is usually kind of buzzy or scratchy. This is the worst distortion you can get. Keep going until it gets really bad – so long as you keep reducing the fader, you won’t hurt anything.
Return the GAIN to a lower level. Remember to keep lowering it past the point where the CLIP light is off. You want to make sure that a shout won’t overload the pre-amp.
The System EQ
The system equalizer should always go between the output of the mix board and the input of the amplifier. There are several reasons for this. Each section of the mix board and all the effects add noise to the signals. The system equalizer can filter out this noise by reducing the levels at the high end. In addition, most effects (reverb, chorus, compressor) can add harmonic overtones to the signal. If the equalizer was in front of the reverb, the higher tones from the reverb would still pass through, and you couldn’t control them. The last reason is that it allows you to run the mix-board at 0-level without over driving the amplifier. The equalizer will have an output level control which you can adjust downward to keep the system level sane, even though the mix board displays show that you are running at 100%.
For now, set your EQ so that everything above 4KHz is gradually reduced (if you have a 16KHz control, it should be at the minimum), and everything below 200Hz is likewise reduced.
Next time I’ll discuss how to use the EQ to control feedback and other problems.
Setting Up
When you arrive for your gig, you need to figure out what goes where in the following order: first where does the drummer go, then the guitar amps, then the guitarists and vocalists. Next determine where your main and monitor speakers will go. Then see if you can set up the mix board somewhere with a clear view of the stage. Last, check for power and figure out how you can run the various cables.
The next step is to figure out how to arrange the channels on the board. If you have a lot of drum mics, then you should group them together on the board. For the rest, there are generally two approaches. Either put each musicians vocal mic channel next to his guitar channel, or group all of the instrument channels together and all the vocal channels together. In all cases, the channels should be connected left to right in the same order as they appear on stage. It is also a good idea to have a mic at the mix board; this can be very helpful for setting up.
Put some paper masking tape on the mix board and label the channels clearly. Connect up all the cables, turn all the faders down, and power up everything (hint: turn the amp on last). Using the mic at the board, confirm that all the amplifier connections are correct by making sound come out of the speakers. After that, have the musicians test each of their mic channels and instruments. Always do this a low levels.
The No-Time Sound Check
If you don’t get time for a sound check before you are supposed to play, you should use the Edgar Winter method. The band should have an instrumental song that they know well. If they play this first, you can get all of your levels balanced. Each musician, including the drummer, should get a brief solo (with the rest of the band still playing the rhythm portion) so that you can get a feel for how loud each one might get. If possible, having the vocalists do some simple group choral thing will test these as well. When they are finished, you should have a good idea whether the PA is “good enough”, or if you have a serious problem.
FYI: the song Frankenstein by Edgar Winter was created for sound checks.
Next Time
I will discuss how to set up the monitor sends, the effects sends, and other tricks. In addition, I will review how to use the EQ to control feedback.