So here is my project. I posted briefly about it in a Meet and Greet thread, but this is the proper place for its discussion. Sorry if it gets long-winded......
I acquired an old Kima strat-style electric guitar from a brother-in-law. Basically, the guitar was in less than desireable condition, and didn't even play when plugged into an amp. I had been thinking about buying a new guitar as it was, and suddenly, I had this light bulb come on, telling me that I should make this old guitar a project, and spiff it up to become a great guitar. I also know that it will be feel even better to play a guitar that I customized and made myself, rather than one I just bought.
I gutted all of the electronics and inner workings, since they were mostly corroded-looking and were definitely busted. The 5-way switch was even bent like 45 degrees to one side. Over time, I will be saving up money to replace them piece by piece. The neck has a bit of a twist, and when I tried to play it before, that was an uncontrollable fret buzz which trumped any musical sound coming from the strings. So the neck must go as well.
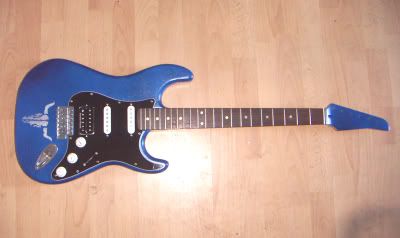
The only part of the guitar I am keeping is the original body, and my first major step is refinishing it. It was originally a sort of cherry red, and I stripped it down over a couple of hours with a few strips of plain ol 80 grit sandpaper and a sanding block. Here is how it looked after that step (the brown spots are places where the wood came through. The white stuff is the original primer, which I mostly left on):
I read some thread on this site about treating a guitar finish like an automobile finish. I just happened to have automobile refinishing supplies around, since I am redoing the hood of an old Bronco at the moment as well. I used Rustoleum brand spray primer, and Metallic Cobalt Blue paint. I know there is a better way, but I made up a quick rig by suspending the body from a rope tied to ends of a weight set frame. I made many, many, thin coats of paint to arrive at the present state. Here are photos of the primer and paint job:


Here is where some questions arise for you experts out there. I am planning on painting some white stripes across the front cutout (see picture below). What would be the best type of paint to use for that, and should I spray it on with it taped off, or tape it off and hand paint it with a brush? Also, I know I need to put on a few clear coats of lacquer to protect the finish from contact with sweaty human skin (heh). Any suggestions as to which type and brand? Here is the design for what the guitar will eventually look like (I apologize for the hastily-drawn photoshop rendering.)

So that is my current place in the project. What do you guys think? Any suggestions are readily accepted as I go through, and as I do, I will add more pictures and updates to my progress to this thread.
Until next time!
I am where my mind put me.
DIY's are great. you are doing a nice job.
one thing about painting stripes is getting the clean sharp edges.
it's tricky. one color tends to bleed under the taped area and you get a crappy line.
the trick to sharp lines is:
tape the area that will be the stripe.
now paint the taped area the body color first.
this will seal the tape. leave everything in place.
next paint the stripe color .
let dry and cure a bit. then remove the tape. you should have a sharp edge.
you see, when you tape and paint the body color (blue in your case) that coat will bleed under the tape and seal it as well.
having the same color bleed under doesnt show.
cool :D
guitar, shmitar
back to the old Bronco.
what year? classic from the 66 to mid 70s' body style?
i am restoring a classic style 74 (uncut) and i would love to see yours.
:D
just kidding about the frankinstrat, it looks like it's going to come out nice so far.
looks are one thing, but tone and playability are more important. have you considered painting the headstock and going with a maple fretboard?
#4491....
Looking good Handelfan!
DIY's are great. you are doing a nice job.
one thing about painting stripes is getting the clean sharp edges.
it's tricky. one color tends to bleed under the taped area and you get a crappy line.
the trick to sharp lines is:
tape the area that will be the stripe.
now paint the taped area the body color first.
this will seal the tape. leave everything in place.
next paint the stripe color .
let dry and cure a bit. then remove the tape. you should have a sharp edge.
you see, when you tape and paint the body color (blue in your case) that coat will bleed under the tape and seal it as well.
having the same color bleed under doesnt show.
cool :D

It'll be a while before I need that tip, but I know I'll remember it and I know it'll save me a tantrum or two... ta muchly! :)
I found this on ebay. Guitar Stripes. Maybe this is what your looking for.
My dad would always talk about retirement, and allude to the pot of gold at the end of the rainbow. And I say all you've got at the end of the rainbow is death. You're riding the rainbow right now. - Mark Borchardt
Hey, go back to where you got your paint supplies and see if they have striping kits, either tape or paint, most auto body supply companys have a HUGE selection of all styles and colors.
After appliying, coat with a couple of coats of clearcoat, this also works with graphic decals and such, just be sure you use the same brand and type of paint as your color coat and make sure its compatable with the stripe material. (Test before trying on your guitar!) I'd hate to see it get ruined, that's a pretty color.
When I die, I want to go peacefully in my sleep like my grandfather, not screaming......
like the passengers in his car.
guitar, shmitar
back to the old Bronco.
what year? classic from the 66 to mid 70s' body style?
i am restoring a classic style 74 (uncut) and i would love to see yours.
:D
just kidding about the frankinstrat, it looks like it's going to come out nice so far.
looks are one thing, but tone and playability are more important. have you considered painting the headstock and going with a maple fretboard?
Yea, I'm curious about the old Bronco aslo. I'm working on a '82 Jeep Scrambler, doing a total frame off restoration.
Nice work on the guitar, btw. I've been considering buying a acoustic guitar kit and trying my hand at building one.
Keep us posted on the updates.
cool looks like you're doing a good job, i recently did an old strat a similar colour but it didn't turn out well, i kinda rushed it really which is what not to do. It's only a knockaround guitar though so nowt major. I'll dig out a photo (i also didn't put anywhere near as many clear coats on as I should have)
and another one i started but havn't finished yet


Epiphone LP Standard trn blue ltd edition
fender squire strat (heavily modified and re painted with WOA festival logo)
Trace Elliot Super Tramp Valve 100 Combo
digtech RP3.
So I finally finished the finish (heh) on this thing, but I decided to forego the stripes because I was just plain too nervous about it, and was not about to pay someone else to do it. I did some tests on scrap wood, and none were acceptable. Plus the pearloid pickguard and the gold hardware would be classy enough eithout stripes. So, that brings me to my current stage. After payday, I decided to pick up some new wire and electrical components, as well as some new strings. I have had experience soldering, and I wired the inside up with the completely new parts, except for the stock pickups (until I get the money to replace them with some better ones, and even a Seymour JB Jr. or two)
Here's the wiring diagram I used: http://www.seymourduncan.com/support/schematics/3s_1v_2t_5w.html
Here's my problem: the guitar plays great, the switch works fine, the tone knobs do their job, but the volume control pot seems to have no effect on the volume. I can turn it all the way down, and the volume stays all the way up. With everything else working, and me being very careful to follow the diagram, what is my problem and how can I fix it? Any ideas? One thing I have thought of is that the diagram shows one of the uh......"round connector things" on the pot to be sorta bent up and touching the soldering of the three ground wires from the pickups. Say I didnt do that, would that cause my problem?
I am where my mind put me.
oops double post, sorry
I am where my mind put me.
One thing I have thought of is that the diagram shows one of the uh......"round connector things" on the pot to be sorta bent up and touching the soldering of the three ground wires from the pickups. Say I didnt do that, would that cause my problem?That'll be it. That's the ground connection for the pot, which is vital for the volume to function. (It should be soldered there btw, not just touching).
Easy fix though :)
that's it. so easy to miss a ground.
so its nice to hear about your project. let's see the final pic.
