Blues Solo Improvisation – A Basic Introduction
Imagine this: the bassist and drummer are laying a bluesy foundation down, the rhythm guitarist is playing that 12-bar blues, and everyone expects you to somehow play a grand solo over it. You look at your band members with despair! What to do?
Many people start playing guitar with visions of hour-long jams where the music just keeps on flowing. Unfortunately for quite a few of these players, they end up thinking that soloing or improvising isn’t for them. They believe that it’s some kind of magic only a few gifted people possess. Over the course of a few articles, I hope to take away this unwanted feeling by giving a step-by-step guide on how to improvise. In this first article we’ll start with the very basics, that is, the 12-bar blues and the pentatonic scale.
12-bar blues
For the rest of this article, we’ll be using the concept of the 12-bar blues and playing it in the key of A major. In case you didn’t know, the 12-bar blues is a chord progression of you guessed it, 12 bars or measures. It consists of three chords:
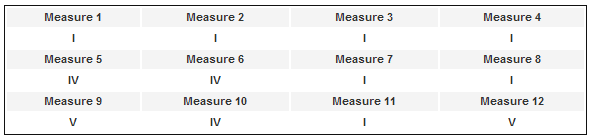
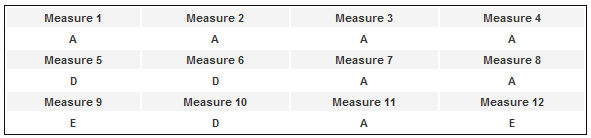
So when we play in the key of A major, we would use these chords:
While, at least for the rest of this article, you don’t really need to be able to play such a progression, it is quite important to have a feel for how it sounds. You can read more about the 12-bar blues in David’s article Before You Accuse Me.
Pentatonic Minor scale.
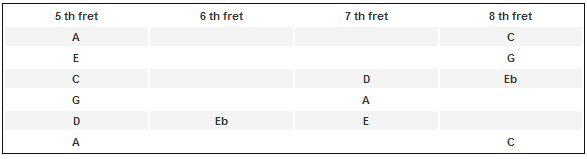
One of the most-used scales in blues and rock music is the pentatonic scale, and we’ll be using this very scale for most of this small series of articles. The pentatonic minor scale is basically a simplified version of the natural minor scale. Take a look at the following table, showing the natural minor and pentatonic minor scales in the key of A:

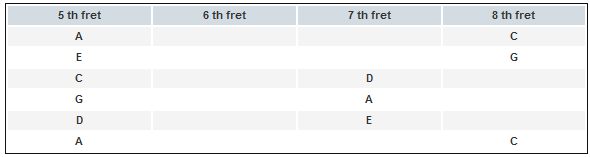
So in other words, the A minor pentatonic scale consists of the following notes: A, C, D, E, G. The easiest way to learning where all these notes are is by dividing the neck into small areas, called ‘boxes’. To keep it simple, we’ll just introduce the first box this article, and introduce others in future articles. This first box starts at the 5 th fret of the 6 th string, and goes all the way up to the 8 th fret of the 1 st string, as shown below.
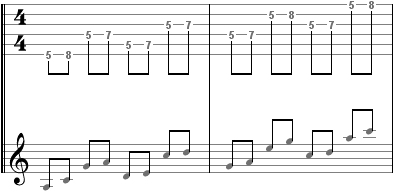
Before we’ll do anything else, we must make sure we know this box inside out, and the rest of this article contains a bunch of exercises to practice this scale.
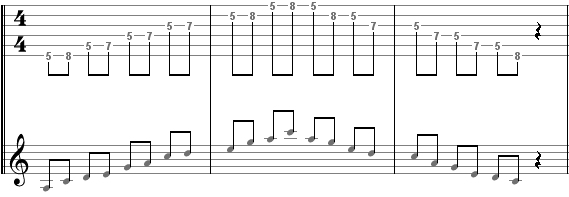
The first one is the most boring one, but there really is no way around it. Grab yourself a metronome, set it to a slow tempo, and play the following tab repeatedly. Fret each note at the 5 th fret with your index finger, each note at the 6 th fret with your middle finger, each note at the 7 th fret with your ring-finger and each note at the 8 th fret with your pinky. Make sure each note rings clearly. When you are comfortable playing the scale, increase the tempo of the metronome slightly and start again.
When you notice you fingers can keep on playing the scale without you having to look at the tab it is time for the next exercise. This one involves string skipping, which simply means not always playing the string adjacent to the one you’re on. Initially, this can be tricky:
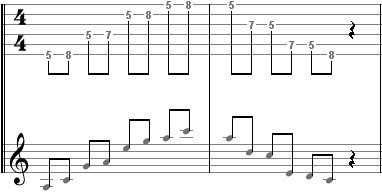
Once again, start at a slow tempo and gradually increase it. When you can play this tab comfortably, move on to the next one.
Okay, so now you probably now where the notes of the scale are in this box, but do you also know the names of each note you play? If not, then this needs lot be learned. Look back to the table above, and notice that there are three red ‘A’ notes. Since this is in the key of A, we call this A note the “root” note. Before anything else, it is absolutely vital you always know where the root notes are. In our example in the key of A major, you will find them at the following locations on your fretboard:
- 5 th fret of the 6 th string.
- 7 th fret of the 4 th string
- 5 th fret of the 1 st string.
Now go back and play the first tab again, but every time you reach a root note you:
- A) Stop playing.
- B) Listen closely to the sound of the note
- C) Say “root – A” to yourself.
- D) Continue with the tab.
Do this a few times and then try both of the other exercises using the same procedure. When you are comfortable with this and can find the three root notes accurately and fast, it is time to learn the other notes. Make sure you not only say the name of the note, but also the number that belongs to it. Practice this in the same way as you practiced the root note, and in the following order:
- 5 th E
- 3 rd C
- 7 th G
- 4 th D
Congratulations! You now know all the notes of the pentatonic minor scale in A, and because you learned the numbers that belonged to it, you will later find it just as easy to find notes when playing in other keys.
The minor blues scale
“What, another scale?” you might be thinking now. Don’t worry! The blues scale is pretty much a pentatonic minor scale with just one tiny note added. This is the flatted fifth (designated “bV”) and is called the “blue note.” As you will later find out, this note can really add that bluesy touch to what you are playing. See the table below to see where this blue note can be found in the first box of the A-minor pentatonic scale.
Now just play the three exercises again, playing the blue notes before you would otherwise play an E note. Don’t forget to use the same procedure to remember its name, saying “blue note – Eb” to yourself when you play one.
Final exercise
The last thing we’ll do in this article might seem very unfair, but it really isn’t just here to frustrate you (no, really…). We’ll end this article by giving three MIDI backing tracks, and the goal is to simply play over it using the A-minor blues scale. You can play any of the tabs given above, or just play something else, it really doesn’t matter. The goal is to get a better feeling of how a blues-bar sounds. Just relax, play and listen to yourself. Try to hear what does and what doesn’t sound very good, and don’t worry if it doesn’t sound superb yet. We’ve barely started the journey into the land of improvisation, so just sit back and enjoy!
And for those who are curious, our next article will deal with various techniques like bending and hammer-ons, and will bring some sort of structure to how you can improvise. Plus, we’ll introduce a new box.
dennis
November 18th, 2015 @ 5:23 pm
the best learning exercise I have found …….thankyou very much
JohnJohn
July 8th, 2015 @ 3:19 am
Perfect! So helpfull!
iceman2355
February 15th, 2015 @ 11:25 am
Very informative felt this article has helped me tremendously
Tim
July 22nd, 2013 @ 12:20 am
Great lesson I would like to see more on .Blues Solo Improvisation with the Basic.
voxdiary
August 30th, 2012 @ 3:44 am
MAN! thanks for the incredible insight!