Banjo Basics

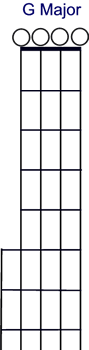
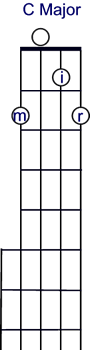
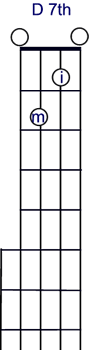
To quickly review from my Introductory Lesson, the I – IV – V7 chords in the key of G are G Major, C Major and D Dominant Seventh (G – C – D7). Here are the chord diagrams on the 5-string banjo for these 3 fundamental chords in the open position:
If you have these basic changes down, you are ready to tackle some real picking and some closed-position, movable chords. Let’s begin by reviewing the tablature system as it applies to the 5-string banjo.
Banjo Tablature
Tablature for the banjo isn’t much different than guitar tablature, in concept. The big difference is that we use five lines to represent the five strings of the banjo, with the top line representing the first string and the bottom line representing the fifth string:

Note that the tablature indicates the tuning of the five strings, as discussed in the first column. Just as with guitar tablature, notes are indicated by showing the fret number to be played on the particular line or string. A zero indicates playing the open string, and you’ll find there’s a lot of that in banjo picking.
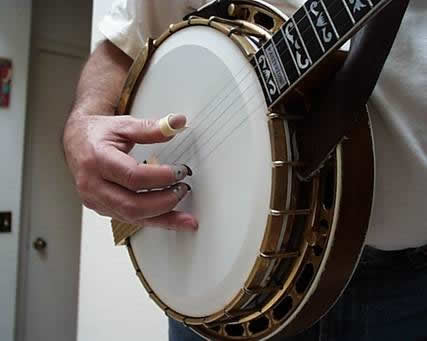
Five-string banjo, played in the bluegrass style, uses the thumb, index finger, and middle finger of the picking hand to pick the strings. Almost invariably, bluegrass banjo pickers use a thumb pick (usually plastic) and two fingerpicks (metal). There are lots of lively discussions about the advantages and disadvantages of particular brands of picks, but I won’t get into that here. The main message I have at the outset is to get used to wearing picks at all times when picking the banjo. If you’re not used to them, it may be tempting to play with naked fingers, but the sound and feel you get is entirely different and this won’t help you get where you want to go.
Another important aspect to discuss at this point is anchoring your picking hand by placing the tip of your pinky and/or ring finger on the surface of the banjo head. This stabilizes your hand and gives you a point of reference to help you hit the correct strings. Many players recommend anchoring with both the pinkie and the ring finger for maximum stability. But many others are quite successful anchoring just one or the other. Here’s a photo showing my hand in place on the banjo as I am preparing to pick:
Another tip for you: always use a strap, even while playing seated. Because of the round shape of the banjo, the neck has a tendency to slide down toward the floor due to gravity, and if the strap doesn’t support the neck you end up having to support it with your fretting hand. This creates tension and bad hand position. I repeat: ALWAYS use a strap. Adjust the strap so that the banjo is in the same position relative to your body whether you are sitting or standing.
Picking Patterns, or “Rolls”
Here’s a simple picking pattern using open strings:

Here’s an MP3 file so you can hear what this sounds like.
Note that I have indicated which finger to use to pick each note (Thumb, Index, Middle). This is useful at first, but before long the finger to use will be apparent, and the letters won’t be needed. Most of the tablature you are likely to encounter won’t show the picking fingers unless there is a particularly tricky passage.
These picking patterns, which banjo pickers generally call “rolls,” are often given names to characterize the pattern and aid in communication between players. For example, the roll above is called the “alternating thumb roll” because the thumb bounces back and forth alternating between playing a melody note on the third (or fourth) string and a drone note on the fifth string.
This might be a good time to give you some general guidelines about how the picking fingers behave. For starters, the middle finger generally picks the first string only, and is usually the only finger used on the first string. The index finger typically picks the second, third, and occasionally the fourth string. The thumb tends to play the third, fourth and fifth strings, occasionally going down to the second or first string. The thumb is the only finger that picks the fifth string.
Dynamics
One of the most difficult aspects of learning bluegrass banjo is bringing the melody (or other important) notes out and making them heard above the barrage of other notes that typically accompany the melody. This is widely neglected in the teaching materials I have seen. I want to help you relate to this from the outset by showing you which notes to emphasize. In standard music notation, an accent mark is placed above a note to be emphasized, and I like to follow that convention. Here is the simple alternating thumb pattern with the appropriate accents shown:

Play this pattern over and over at a slow and steady pace, putting a little extra “punch” on the first note of each four-note group. Because the thumb is the strongest finger, we try to use the thumb whenever possible to play melody notes to make it easier to bring the melody forth. But there is a paradox here. The thumb is also used to play the fifth string exclusively, and you generally want that fifth-string drone note to be subdued. So you need to concentrate to make the melody notes stand out, and yet maintain a delicate touch on the fifth string.
Here’s an MP3 file illustrating what we’re after:
Incorporating Chord Changes
Once you have this pattern working smoothly, try changing chords while keeping the pattern going. Start with the open G, then switch to C, then back to G, then D7, over and over. Here’s what this looks like in tab:

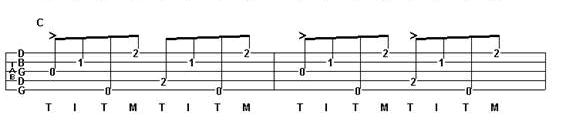
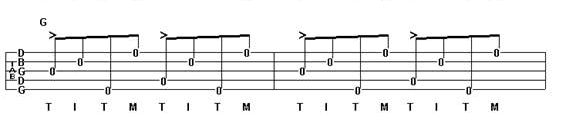
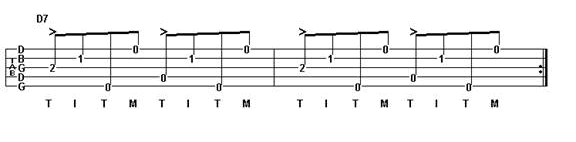
And here’s what it should sound like:
Play it nice and steady, at a pace you’re comfortable with, over and over. Remember to keep your picking hand anchored and don’t forget to practice wearing your picks – you’re only cheating yourself if you don’t. When you have it down slowly and smoothly, pick up the pace a bit. Here’s what it sounds like at a medium speed:
Of course you can vary this basic roll in numerous ways. As a simple example, take a look at this:


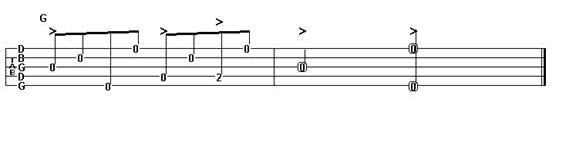
Notice that we are introducing some melody notes that are not in the chord – for example the fourth string second fret (E) note in the first measure. There is also an example of altering the basic roll to introduce extra melody notes. Look at the fourth measure. You are holding a C chord at that point, but to get the melody note on the third string second fret (A), move your middle finger over from the fourth string to the third string just long enough to play that note. Be prepared to return it to the fourth string in time to play the extra melody note, which is the second-to-last note in the measure.
The seventh and eighth measures are interesting. This is a common descending run in D. To get the fourth string fourth fret (F#) in the second half of the seventh measure, you need to stretch down with the pinky. Then to get the fourth string second fret (E) in measure eight, move your middle finger over from the third string.
We end the tune with a pair of half-notes – the third string open, and then a “pinch” where you simultaneously pick the fifth string with your thumb and the first string with your middle finger.
Practice this piece over and over until you can play it smoothly and steadily. It should sound something like this:
Although it is a lot of work, I am enjoying putting these lessons together, and very much appreciate the feedback I’ve already received. Please drop me an email at [email protected] if you have any comments, questions or suggestions. Next time, I’ll show you how to play simple rhythm backup, and introduce you to the all-important closed major chord positions that will allow you to play all over the neck in any key.
Let me close this lesson with an improvised bit of musical doodling based upon the information in this lesson, just to stimulate your imagination. I encourage you to experiment to see if you can incorporate similar sounds into your own playing. Listening and stealing bits of what you hear is an extremely valuable element of your musical education, and certainly a part of the “oral tradition” of folk music and bluegrass.
andrew deshaw
May 31st, 2016 @ 5:56 pm
I am really enjoying working on the rolls and the way they sound on the banjo. Great lessons. I can use these rolls in folk finger picking as well.
Thanks
Andrew
tony
October 2nd, 2015 @ 2:46 pm
I bought a 5 string banjo on Monday,found your site on Friday and think its great for learners.
Look forward to continued viewing.
Thanks very much
Tony ( U K)
Tim
August 27th, 2015 @ 8:38 am
Thank you for taking the time to develop and post these lessons. I’ve just started learning to play the banjo and love it. I find learning the chords and consistently finding them challenging, but rewarding when my picking starts to resemble the makings of a melody. The visual tabs along with the MP3 downloads are very beneficial. Tim
Flausch
February 13th, 2015 @ 5:07 pm
I live in germany and its extremely hard (or should i say impossible?) to find anione here who teaches the five string!I have to rely on youtube lessons and good stuff like this here!i play for allmost 3 years and still didnt get surten stuff.Your lessons really help to actually understand whats giong on without digging my way through tons of music theory! Great I love it had such a good evening with your lessons
Liebe Grüsse
DOUG KIMBALL
March 3rd, 2013 @ 3:04 pm
This is great…. Thank You SO MUCH. I took clawhammer lessons several years ago and have played that style since.. I now want to play bluegrass picking style in the worst way !!! I have been practicing with tidbits like this that I pick up . I must say that this is the most helpful one yet. I may be learning bad habits by doing it myself, without lessons, but I am enjoing it at 61 years old. I really wish I had done this 40 years ago !!! Thank You Again for your time !!!!
johnny vee
February 15th, 2013 @ 2:08 pm
this is awesome. thank you for doing this. tremendous help!!!!
Harke
December 7th, 2012 @ 3:28 am
Hey, thank you very much for the lesson. iam looking forward for the next one.
Nice greetings from Germany
Bill
November 20th, 2012 @ 2:18 pm
Hi Pease,
I am just starting on the chords and I have really large hands and fingers. I find that I am not able to single out a string without touching another string that should be open.
Do you know of any finger ‘gloves’ that can be worn so as to be able to pick out only a single string for chords?
Many thanks,
Bill
Robert
June 28th, 2012 @ 6:32 am
David,
As in playing Guitar there are the 5 Root shapes on the fretboard.I have a copy of the complete fret board for 5 string Banjo but for the life of me I am unable to find the root shapes. Any Help would be appreciated!!!
Thanks
David Hodge
June 30th, 2012 @ 11:11 am
Hi Robert
Because of the open G tuning of the five-string banjo, players tend to focus on three basic shapes instead of five. The first one is simply barring all the strings at any given fret, such a playing all open strings for G or all the strings on the fifth fret for C. The root note of this shape will be on the G string.
The other two chord shapes you can find in this lesson: https://www.guitarnoise.com/lesson/mastering-the-neck-of-the-5-string-banjo/ For the “F” shape, the root note is on the D string. For the “D” shape, the root note is on the B string.
I hope this helps. Please feel free to post any further questions you may have. I look forward to chatting with you again.
Peace
Lorraine
June 1st, 2012 @ 3:49 pm
Great! Haven’t played in a while and it is coming right back. How do I find the next lesson? T.Y.
David Hodge
June 1st, 2012 @ 4:20 pm
Hi and thanks for writing
Russ only wrote three lessons (and one review) for us, back in 2003. This is the second one and you can find the third one here:
https://www.guitarnoise.com/lesson/mastering-the-neck-of-the-5-string-banjo/
Hope this helps. And who knows? Maybe one day soon we’ll be posting more banjo lessons here at Guitar Noise. Let’s hope so.
Peace
Anthony
May 28th, 2012 @ 12:47 pm
Hi Please confirm,You mention chords and not notes on the banjo, my friend playes banjo his fingers just keep hopping of what looks like notes on the fret board,it does not look like he is holding down chords, am i right
Kind Regards Anthony
David Hodge
June 1st, 2012 @ 4:24 pm
Hi Anthony
And thank you for writing. Chords are made up of notes and, usually, when a banjo player (or a guitarist for that matter) is jumping around on the fretboard, they do so in particular patterns, which are (again, usually) based on scale positions which are, in turn, based on where various chord shapes are played up and down the neck. When one is starting out, it makes sense to concentrate on learning where these chord shapes are so one can quickly develop the technique and speed to shift from one position to another.
There are, of course, many ways to learn!
Hope this helps.
Peace
Danie
March 8th, 2012 @ 2:08 am
thank you this is realy helping ,im just Batling with my pinky on the D note but ill just pracise.