Recording on A Budget Part 2 – Recording Concepts
In part 1 of this series (Recording on a Budget Part 1), we discussed the equipment necessary to create a basic home musical recording setup. We’ve kept the cost down to a minimum, and we’ve gathered all the necessary equipment. The big question now is, how the heck are you going to use all this stuff you’ve gathered together? And don’t forget the little questions like, where does this plug in, why do I need that, and what does this thing do? Suddenly, the pile of recording stuff you’ve collected can start to seem a little intimidating. The simple truth is, recording (even home recording) can get pretty complicated, but don’t let that pile of stuff scare you. As with most things complicated, the recording process can be broken down into a series of steps and concepts that are relatively easy to understand. Before we proceed with the actual process, we’ll first need to discuss some of the more common concepts involved in home recording. In this installment of “Recording on a Budget,” we’ll examine some of those concepts.
Multi-track Recording
The most important device to understand when making a home recording is the multi-track recorder. A multi-track recorder is a recording device that can record individual things concurrently and separately so that they can be played, recorded over, or otherwise manipulated individually without disturbing other parts of the mix. For example, you can record the guitar separately from the other instruments thus enabling you to change the guitar’s volume, its effects, or any number of other characteristics without changing anything in the other instruments. In fact, you could even erase the guitar completely and the rest of the recording would remain unchanged.
To illustrate this, let’s look at how an analog 4-track recorder works. The diagram below is a representation of the surface of the tape used to record your instruments. In most 4-track recorders, it will be nothing more than a standard cassette tape like the ones you use in your home stereo system.
Figure 1
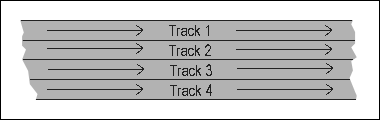
Each “track” in the illustration is an area that can be recorded onto separately. For instance, the guitar mentioned above could be recorded onto track number 1, the drums could be on track number 2, the bass could be on track number 3, and the vocals could be on track number 4. With such a system of separation, the guitar could be erased from track number 1 without affecting the instruments and vocals recorded on the other three tracks. Also, using this system, the tracks 2, 3, and 4 could be played while track number 1 is recording. This makes it possible for the guitar to be recorded while the musician jams along with the other three tracks on the tape.
A 4-track recorder has four parallel divisions or sections called tracks where individual and separate sources can be played or recorded. In analog equipment containing more than four tracks, this system is mechanically the same, except the tape is usually larger so that it can physically contain more tracks. On the other hand, digital equipment requires a little imagination to understand. The principle of separation of the concurrent tracks is the same, but the tracks are created digitally inside the machine. You can’t (at least I can’t) draw them out on paper, but for conceptual purposes, they are the same as those in any analog multi-track recorder.
Ping-Pong
Once you understand how a multi-track system works, you’re ready to tackle the subject of ping-ponging. In the tabletop sport of ping-pong, a little plastic ball is bounced back and forth across a table. In multi-tracking, a recorded piece of audio is bounced (via recording) from one track to another. Consider the illustration below.
Figure 2
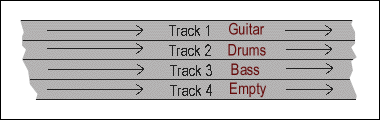
Let’s say we wanted to move the guitar recording from its current position in track 1 into a new position on track 4. We would (through some controls on the multi-track machine) record what is on track 1 onto track 4 by playing the tape and using the appropriate knobs and switches to set track 4 in “record mode.” Once that was done, the tape’s tracks would now be configured like this.
Figure 3
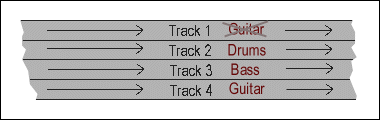
As you can see, the guitar has been recorded onto track 4. It didn’t, however, erase the guitar that was already on track 1. It simply copied it. On a digital machine, this can be done electronically without having to physically record (and listen through the whole song) like we would using analog equipment. It would be a similar internal process to the one that occurs when you copy and paste text on you computer.
Okay, I know what you’re thinking. Why would you want to move the guitar to another track in the first place? The truth is you probably wouldn’t, but if you wanted to move both the bass and the guitar onto track 4 you would gain a major advantage. In Figure 2, you only had one empty track, but if you moved the guitar and the bass onto track 4, you would leave two tracks available to be recorded over by other instruments.
Figure 4
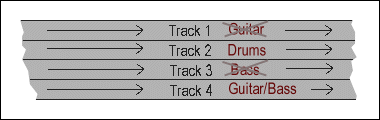
As in figure 3, the guitar and bass haven’t been erased from their original tracks, they’ve just been copied as a set onto track 4. The good news is that you have two tracks available to use now instead of only one, but the bad news is that now whatever changes you make to the bass will also affect the guitar. They are now tied together inseparably onto a single track. You have in effect just “ping-ponged” them from their original tracks. The technique of ping-ponging can be used over and over again as a means of turning four tracks into as many tracks as you need. The only drawback is that each time you record and erase a track on an analog tape, it will suffer some wear and tear, and each time you move it from one track to another the quality of sound for that instrument (or voice) will be reduced. This loss of sound quality (called generation loss) is something you should keep an eye (or ear) on. In theory, ping-ponging can be done an unlimited number of times. However, on tape there is a practical limit. On the other hand, if you’re recording digitally, there is virtually no generation loss at all, so ping-pong to your heart’s content.
Punch in/out
Sometime during the recording process, someone is bound to make a mistake. A guitar player may hit a sour note, a bad cord might make an electrical hum shoot through a recorded track, or a phone might ring in the background of an otherwise good vocal recording. Any number of things might go wrong. In fact, any number of things will go wrong. Don’t let it stress you too much; it’s all just part of the recording experience. Besides, thanks to a process of punching in and punching out, those little recording faux pas can usually be reduced to nothing more than easily remedied inconveniences.
Basically, punching in and punching out is a process for editing out mistakes on individual tracks. It works something like this: Let’s say the guitar is to be recorded onto track two. Your guitar player is on a really good day and gets it perfect on his first attempt except for one wrong chord in the middle of the second verse. Using the technique of punching in and punching out, you won’t have to make him do the whole thing over again. He’ll only have to play through the part of the song where the mistake took place. All you have to do as the recording guy is rewind the tape to a few seconds ahead of the mistake (far enough ahead for the guitar player to get in the groove), and play it back while he jams along. Once the playback gets near the spot where the mistake was, you start recording his guitar onto the same track (punch in) and when the playback gets past the mistake, you stop recording (punch out). Planning the punches on places in the music where there is a pause in the guitar part will ensure a nearly seamless fix even on inexpensive equipment.
In addition to fixing mistakes, the process is very good for doing parts over and over until you get them just the way you want. It’s especially good for insertion of backup vocals and special effects. We’ll talk more about this in Part 3 when we discuss the step-by-step process of home multi-track recording.
Mixdown
Once you’ve recorded everything you want and you’ve ping-ponged and edited your recording to your satisfaction, you’ll be ready to mix it all together, add effects, equalize the complete mix, and record the whole thing onto a single master tape or onto any number of digital media. This is called mixdown. No matter what kind of multi-track recorder you’re using, some kind of mixdown is always necessary.
If the multi-track unit is analog, the mixdown is done by playing all the tracks back and adjusting them so that they sound good together. Once that is done, the finished mix can be recorded onto a cassette or can be digitized as a finished product. If the multi-track is digital, its final mix can be recorded in the same way, or it can be converted directly to a digital format that can be read by a CD, DVD, or MP3 player. The resulting recording from either a digital or an analog 4-track can then be used as a master for making copies.
A Word on Detail
Detail, or attention to detail, is the most important concept in all recording. Even though you’re on a budget and your equipment is a little lacking, if you pay close attention to the details, your finished product can still turn out to be something you can be proud of. Bad recordings aren’t usually the result of one giant mistake. Instead, they often result from the cumulative effect of a huge amount of seemingly insignificant oversights. For instance, if you have one bad mic cord that causes a nearly inaudible hum on a single take, it probably won’t hurt the overall mix too much, but if you use that same cord every time you record any take on any track, the hum will multiply to where it becomes real problem. It will ultimately ruin your whole recording. Don’t let one anything ruin your hard work. Always use the best equipment available to you, never say, “that’s good enough,” and never be afraid to do a second take. Later in the process, you may not be able to. It’s the little things – the details – that make all the difference in the world.
In Part 3 of “Recording on a Budget,” we’ll begin a step-by-step examination of those details as we walk through making a home multi-track recording.
About the Author
Scott Hysell used to run the PA System Tutorial website, a site that dealt with all PA systems. He has written three articles for Guitar Noise, including: Soundcheck: A Necessary Evil, Recording on a Budget Part 1 – The Equipment and Recording on A Budget Part 2 – Recording Concepts.