Well, I Woke Up This Morning – Study in Blue
It’s going well, isn’t it? You’ve got the guitar; it’s tuned well enough to sound good; your fingers still hurt but nowhere near as much as they did; Tab is easy enough, and Standard Notation? Well even those little black dots are not as horrible as they first pretended to be, are they?
Yes, it’s going really well.
Until, that is, Aunt Lisa and Uncle Darren turn up unannounced.
“Oh, your mum said you’d got a guitar. Give us a tune, then” says your favourite Aunt.
Blind panic sets in, but you mumble something about being just a beginner and launch into the best performance of The Grand Old Duke Of York and Good King Wenslesslosslass, Good Kind Wencl, Good King Woos, Silent Night that you can muster.
“Lovely” says Auntie.
Uncle Darren is completely underwhelmed, but talks to you about your instrument and even has a go – he tried to learn when he was young, he says, but “couldn’t get on with it”
So, you’ve just given one of your first performances to someone who doesn’t live in the same house as you do, and you’re writhing with embarrassment. You wish you could have played something that would have really knocked them dead. Let’s see what we can do about that, shall we?
Copyright Notice: The attached files form an original composition by the author; and may be downloaded, printed and distributed freely.
At this stage, some of you will be thinking “Uh-oh. Original Composition? Hey, we’ve seen this guy on the Forum Pages – he’s a Classical Player. What have we just let ourselves in for?” Don’t worry, this isn’t a Classical Study, and I promise I’ll be gentle.
OK, put down your plectrum. I’d like to introduce you to your fingers.
On your fretting hand:
- The Index finger is 1,
- The Middle finger is 2,
- The Ring finger is 3
- The pinky is 4.
That’s not too horrible.
Your playing hand strangely seems to have turned Spanish.
The thumb is now “Pulgar”, and the fingers, in order, are Indice, Medio, Anular and Chico – collectively p-i-m-a-c for short. Remember these – you’re going to be seeing a lot of them.
Let’s look at the music. This Study is called Study in Blue and it’s a simple twelve-bar Blues. First of all, I want you to take some things on trust. This Study is in the Key of E Major. The Primary Chords in that Key are E, A and B7 (don’t worry if you don’t know how to finger them) and by using these three chords we can achieve good harmony with every note in the E Major scale.
We’re going to be using a special scale for playing Blues, called the E Minor Pentatonic. Hang on, you say, I thought you said we were in E Major? And so we are, but we’re going to achieve that distinctive Blues sound by tinkering with some of the notes, particularly the 3rd and 7th notes of the Major scale.
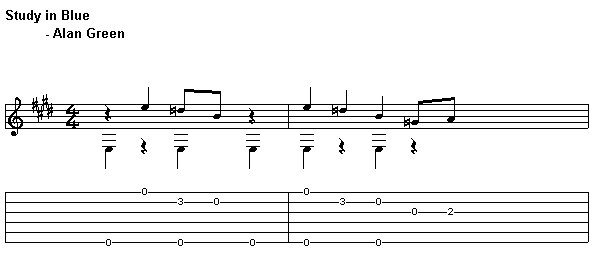
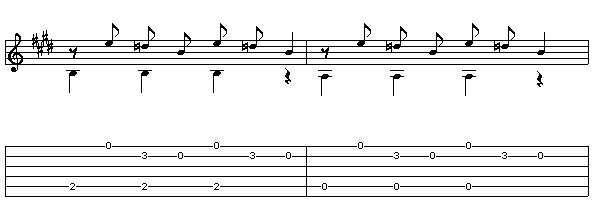
Down to business. Look at the first bar/ measure of the Study. Ah, yes, “Measure” is the modern term, and “Bar” is the Classical definition – they mean the same thing. You’ll see that the open 6th string (E) is played on beats 1, 3 and 4. Try this now – use your thumb (p) to play those three notes on the open string – 1, rest, 3, 4. Let the notes ring, and play it a few more times.
Now let’s look at the other notes in that first bar. On beat 2, you’ll see we play the open 1st string (E’), and I’d like you to play that with your middle finger (m). Playing these four notes should be quite easy at the moment, so play it through a few times – thumb on the 6th string, middle finger on the 1st p-m-p-p p-m-p-p.
What have got on the 3rd beat of that bar? We’ve got two quavers/ eighth notes in there, that’s what.
Quavers? “We need an interpreter”, you say. A Quaver is the Classical term for an Eighth Note.
The first of those two notes wants to be played at the same time as the bass note. We’re going to play those quavers with our index and middle fingers (i-m). Practice this a few times, and then use the thumb to play the bass note at the same time as you play the 2nd string with the index finger. That’s actually our first bar done, and you will find you’ve been using this finger action:

On to the second bar.
A definition: A Crotchet is the Classical name for a Quarter Note.
There are no surprises here; simple crotchets/ quarter notes for the first three beats. Play the open strings on beat 1 using your thumb and index finger. Use your middle finger to play the second string on beat 2, and then your thumb and index finger to play the two open strings on beat 3. The fourth beat is quavers/ eighth notes again – play them using m-i this time. Once you put this bar together you have a finger action of:

Play this through a few times.
Sound good? I liked it so much I bought the Company. Sorry, got carried away there – I like it so much we’re going to play that two bar pattern twice, and that will be the first four bars of our twelve-bar Blues done. Go get a coffee.
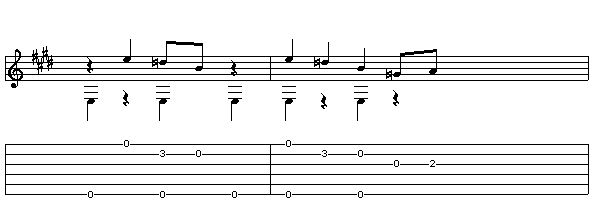
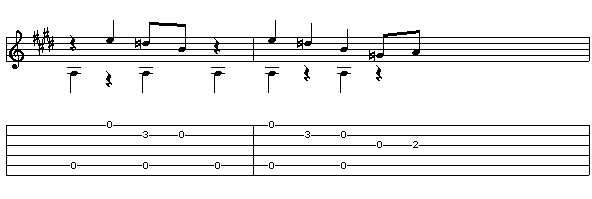
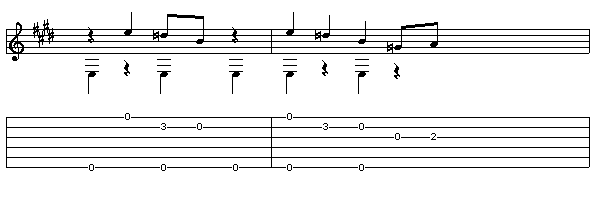
Have a look at bars 5 and 6. The top line is the same, but the bass note is different. Our finger action is going to be the same as bars 1 and 2, except that the thumb will be playing the open 5th string (A). Try it a few times until you get the hang of it, and then……. add it to the first four bars. Does that sound good, or what? Onto bars 7 and 8. These are bars 1 and 2 repeated and should cause you no further problems. Try playing all eight bars together a few times.
So, what have we done? We’ve used a simple two-bar finger pattern four times and the only change throughout was the use of the 5th string in bars 5 and 6. Make sure you’re comfortable with these eight bars before going any further. Who said Blues had to be complicated?
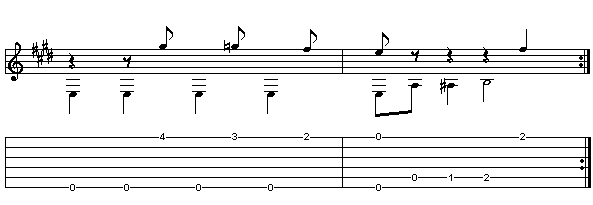
Me, that’s who. In bar 9, we get busy. Play the bass notes with the thumb as normal. The top line starts with a quaver/ eighth note rest on the first beat, and the first note of the top line is played at 1&. The six notes of that top line should be played m-i-m-i-m-i, and I would like you to practice that for the next fifteen minutes. When we add back the bass notes, we get a finger action for that bar/ measure of:

Take some time to practice this, as the index finger of your fretting hand (1) should hold the bass note (B) throughout the first 3 beats, and the ring finger (3) should fret the 2nd string at the 3rd fret on the two occasions it is necessary.
Bar 10 is the same as bar 9, but the index finger of the fretting hand (1) is not needed. You should still use the ring finger (3) to finger the 2nd string at the 3rd fret. Play these two bars together a few times, and then add them to the first eight bars.
Onto bar 11. Ooh! Funny symbols! Panic not. Remember we talked about tinkering with the 3rd note of the scale? That’s all we’ve done here. In the 2nd beat of bar 11 we play the G# from a standard E Major scale, in the 3rd beat we play a G natural from the E Minor pentatonic, and in beat 4 we flatten that G once more to give us Gb, which is usually written as F#. Use the thumb to play the bass notes as before, and the middle finger to play the top line, so your finger action looks like this:

And so to bar 12. There will be times when you need to do some fancy fingering in the bass line, but this is not one of those times. Use the thumb to play all four bass notes, the index finger to play the open 1st string in beat 1, and the middle finger to play the fretted 1st string in beat 4. Your finger action should look like this:

Now, if you play bars 11 and 12 for a while, and then add them to the first ten….Result!
I want you to look at the bass note on the 2nd beat of bar 12. You’ll hear the “blue note” mentioned from time to time, and this is what it means – it’s the sharpened 4th/ flattened 5th of the Major scale. Don’t overdo it with this note when soloing. It’s hugely dissonant (being a tritone from the root – you don’t need to understand this) but it’s good fun to use in careful doses.
You’ll notice that our bass line used the notes E, A and B, and that we said the Primary Chords in the Key of E Major were E, A and B7. Harmony doesn’t come much simpler.
One final thing. The thumb on the fretting hand. You’ll hear a lot of discussion about the Classical Position for the thumb and the Baseball Grip. I’m going to confess that I use both, and my advice to you is to use whatever thumb position gets you through the exercise with the notes sounding clearly. I have played the Study completely in Classical Position, and completely in Baseball Grip, and I suspect you will find that a mixture of the two will be best.
So, there you have all twelve bars. It’s time to put them all together. Once you can play the whole Study from start to finish, set your metronome to something slow (the Study and the MP3 files play at 60 bpm) and don’t play it any faster until you can play it smoothly at that speed. Remember, Blues is an art-form defined by interpretation, not by speed. Enjoy.
Feedback and questions to: [email protected]
dave
July 4th, 2012 @ 12:05 pm
hello, and thanks for the cool lesson. just wondered why you suggest we use a different finger to play a second note on the same string, as in the 3rd beat of bar one, using the middle then index on the B string…
thanks!