What A Wonderful World
So, why did I choose “What a Wonderful World”? Well, I’m scheduled to give a talk later this month at my church Sunday service. The talk will be quite personal, the title being “Cancer: A Blessing or a Curse?” I was diagnosed with a rare cancer almost five years ago. It’s incurable but slow-growing and treatable, and thanks to a great oncologist, I’m currently enjoying a good quality of life. For me, my cancer has been a wake up call and has given me an appreciation for life unlike I’d ever known in the past. I am choosing the hymns for that Sunday service and I will be providing the accompaniment on my guitar… so what better song and message could I find but “What A Wonderful World” for one of my chosen hymns.
It’s likely that many of you know this song, but in case you don’t, go to YouTube and search for “What a Wonderful World Louis Armstrong” and you’ll be in for a real treat.
So if you’re ready, then let’s get to it…
These files are the author’s own work and represent his interpretation of this song. They are intended solely for private study, scholarship or research.
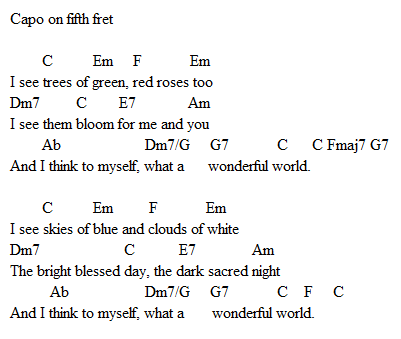
Like my first arrangement, the process started by searching the Internet for the chords and lyrics. “What A Wonderful World” was performed by Louis Armstrong in the key of F, and that’s what I found on the Internet websites. I prefer the sound of chords with open strings, and in F, a few of the chords were not my favorites such as Bb and Db. They’re doable, but I really wanted a friendlier key. After a while of some experimentation and transposing, I settled into the key of C. I decided that, as far as this lesson goes, I’d put my Capo on the fifth fret and my arrangement in C would actually be in Louis Armstrong’s F for those wanting to play along with his recording.
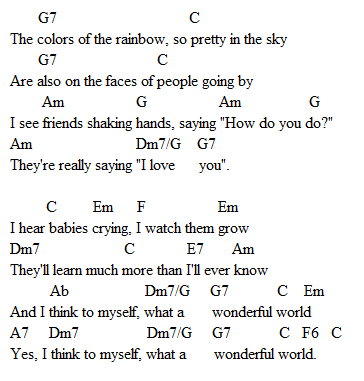
So, here is the Internet arrangement of “What a Wonderful World” transposed to the key of C:
In case you’re not familiar with the tune, here’s the entire melody, written after closely listening to Louis Armstrong’s performance; and, giving credit where credit is due, playing that melody several times for my wife, Nancy, who has a great ear and the ability to say things to me like, “Hank, that note right there didn’t sound right”, or “I think you added an extra beat in there someplace”.
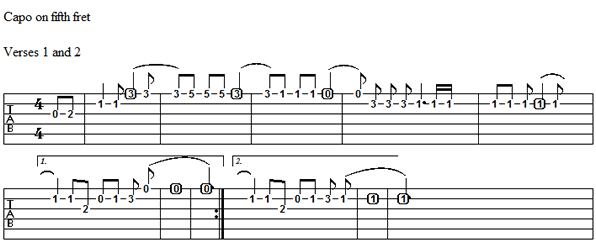
And, here’s how this melody sounds:
“What A Wonderful World” consists of a verse played a total of three times and a chorus. The first verse ends with a “turnaround” that gets it back to the beginning for the second verse. Following the second verse, the chorus is played once. The third and final verse has four additional measures when compared to the first two verses. Those four measures serve as the final ending.
[NOTE: What I’ve called the chorus throughout this lesson is actually a bridge. David pointed this out to me after I had submitted my entire lesson, MP3’s and all, to him for his review. Thankfully he was kind enough to not insist that I make the necessary corrections in this lesson, which would have involved a lot of work. So please forgive the misnomer and please keep in mind every time you read or hear the word “chorus”, it’s really the bridge that’s being referred to. One final word on this… my error made it obvious that I needed a little work at recognizing song structure, so I read and bookmarked David’s lesson, “Unearthing The Structure“. I think I’ve got it now.]
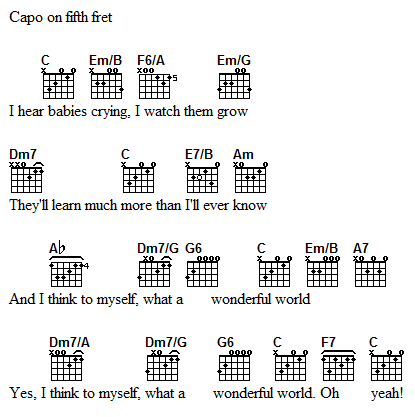
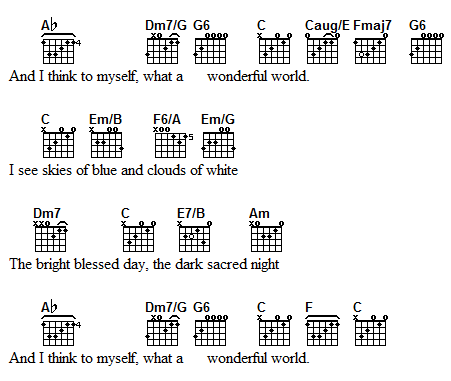
Initially I began playing the chords in root position as taken from the Internet, and I sung along. It wasn’t bad, but I thought I could do better, particularly by adding some movement in the bass. I also decided that I wanted to catch as many melody notes as possible on the upper strings of the various chords to help carry my voice and the voices of those in my church who would be singing along with me. So, here’s what I came up with, starting with the first verse and “turnaround” ending:
As you can see, the first line has a descending bass movement from C to B to A to G. Similarly the second line bass notes move from D to C to B to A. There’s even a bit of ascending bass movement in the turnaround in the last line from C to E to F to G. As mentioned earlier, I’ve also incorporated most of the melody notes into the upper strings by carefully selecting the various chord voicings. If I’m really conscientious about ending the chords on a melody note, then I have to be careful not to play the first string on the C chord in the first line, on the E7/B and Am chords in the second line, and on the Dm7/G and G6 chords in the third line. The reason for this is that in these chords the melody notes fall on the second string. If I really want to get picky about hitting the melody notes, then I also have to avoid the first two strings in the Ab chord in the third line since the melody note is the C on the third string. Frankly, this all may be more trouble than it’s worth, particularly if you are strumming. The chord voicings do sound fine as written, and the vocalist will hopefully be hitting the melody notes properly.
Of the chords in this first verse, I have a few favorites. One is the F6/A in the first line. I wanted to hit the A melody note on the fifth fret of the first string, so I knew that I could take a “C form” partial barre chord and slide my first finger up to the fifth fret to play an F chord called for in the Internet arrangement. However I wanted an A as the bass note, so it made sense to play an open fifth string to get the A in the bass. I realized that leaving the fourth string open would make the fingering of the chord much easier. I also realized that the D of that open fourth string is the sixth of an F chord. I strummed, it sounded beautiful to me, so the F6/A became my choice.
My other favorites are the four chords that make up the turnaround in the last line. First, there is an ascending bass line. Second, the open high E string that all four chords have in common is the melody note that is held for two measures and, in my mind, gives the very cool effect of a “pedal” tone.
Let’s listen to the first verse. Because this song was arranged with a lot of attention to movement in the bass notes, this first sound file will be played by striking the bass note on the first beat followed by a down stroke on the second beat. I will try to end those down strokes on the melody note, but again if I miss one here or there it won’t make that much difference. As long as the notes strummed are part of the chord, they’ll sound fine. In case you’re interested, I’m using a pick for this.
Let’s have another listen to the first verse, this time played finger style. With my right finger picking hand, I generally use my thumb for the bottom three strings and use my index finger on the third, my middle finger on the second, and ring finger on the first string. Again I’ll be attempting to hit the bass note on the first beat, though at times I will likely “pinch the bass note with my thumb and catch a higher chord note with one of my fingers. After playing the bass note, I generally will play the rest of the chord with arpeggios, trying to catch the melody note as the top voice. But don’t be surprised if I through in a simple strum now and then for variety.
Let’s now have a look at the second verse:
As you can see, the only difference between the first and second verses is the ending. In playing the C and the F chords for the ending’s first measure and the C chord for the ending’s second measure, it is a good idea to try to stay clear of the high E string since the melody note for both measures is the C located at the first fret of the second string.
Let’s listen to this second verse. I’ll play it through once – again I’ll be hitting the bass note on the first beat. On the second half of that beat I’ll be hitting the next chord note and on the second full beat I’ll pluck the remaining chord tones. I’ll be using just my right thumb for first beat and just my fingers for the second.
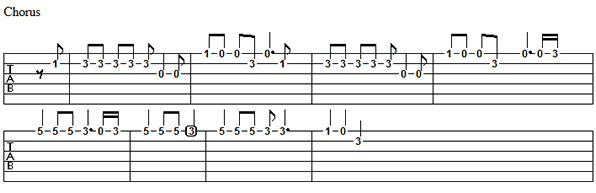
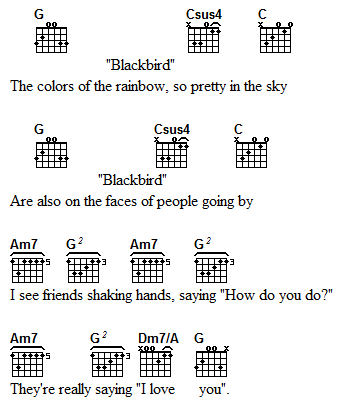
That wasn’t so bad, was it? The second verse leads right into the chorus; so let’s see how this looks:
A few words about the chorus: The G chord in the first two lines is voiced so that the D melody note is included on the second string. If you are intent on emphasizing that melody note, simply avoid playing the first string. The Csus4 chord resolving to the C chord in the first two lines emphasizes the portion of the melody that moves from the F to the E on the first string. The reason for voicing the Am7 chords in the third and fourth lines as barre chords is to catch the A melody note on the first string. The G chords that follow could just as easily be played in an open position, if that’s your preference – I just find it easier to slide my index finger down two frets and reform the G chord as a barre. I really wanted to accentuate the D melody note on the final G chord so I intentionally placed an “x” on the first string as a reminder not to play that string.
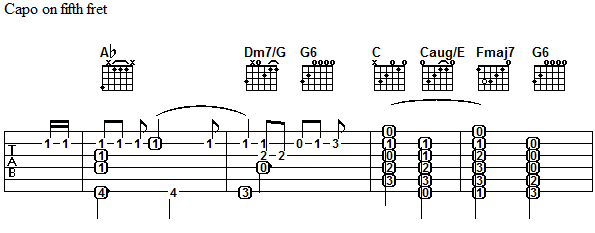
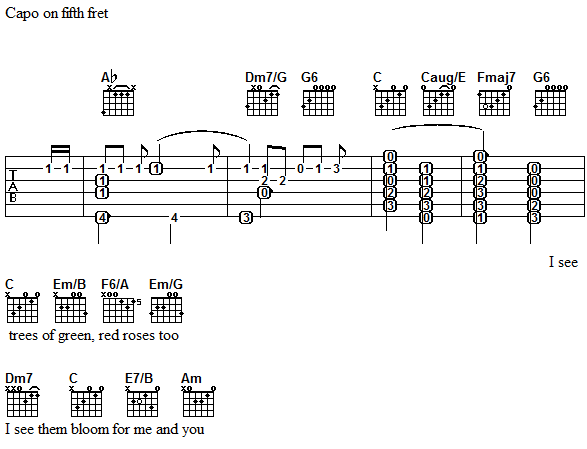
The optional “Blackbird” licks notated in the first measure of the first two lines are applicable if you are playing this arrangement finger style as I usually do. That first measure can certainly be played utilizing the G chord for all four beats, or alternatively, to make things a bit more interesting, the G chord can be played for two beats and the “Blackbird” lick can fill in the last two beats if played as a triplet. Most of you probably recognize this as part of the Beatles’ Blackbird (Guitar Noise Songs for Intermediates # 2), although you can certainly hear it in many other songs as well. On the sound files you’ll likely hear me playing this first measure as follows:
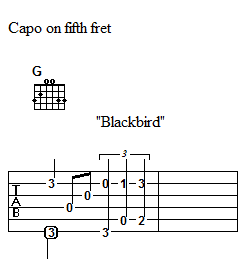
Let’s keep things simple for a moment and listen to the chorus strummed without the “Blackbird” lick:
For the next sound file for the chorus, I chose to go finger style, and I chose to go with the “Blackbird” lick, because I like it so much, and it just seems to add interest to the accompaniment. At the very end of the chorus, one thing you’ll hear me do on the Dm7/A chord is to actually play the melody to “I love you”. It’s pretty simple – all I do after hitting the F on the first fret of the first string is lift my index finger and strike the open E melody note. That followed up by the Em/G chord with the second string D as the melody note and you’ve got it. So, without further ado, let’s have a listen to this version:
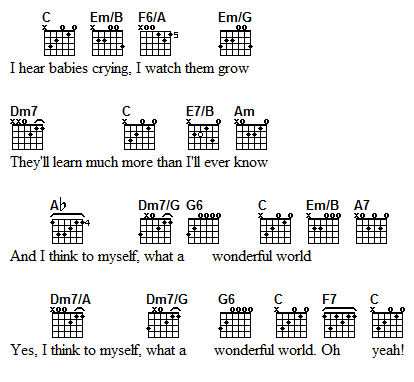
At last we arrive at the third and final verse. As you’ll see, the first two lines are identical to those in the first two verses. The third line starts out the same as the previous verses but has a different ending in the last two measures. And there is a fourth line that serves as the ending for the song. Here’s what it looks like:
In my opinion, it’s a good idea to play the melody note of the very last three chords (the ending) properly. All that entails is to avoid the first string in the first C chord, so that the melody, the “world” is played on the C on the second string for two beats. The “Oh” is sung over an F7 chord, and again the first string should be avoided to accentuate the melody note C on the second string for another two beats. The final C chord that accompanies the “yeah!” can be played normally and held for four beats since that very last melody note is on the open E of the first string.
Just to mix things up a bit, I’m playing this verse using my thumb to strum the chords. Here’s how the entire third verse sounds:
As tempting as it might be to call it quits here, to make this song really sound professional, it really needs an “intro”. I wanted some type of instrumental “intro” that would make a nice transition into the vocals. I decided that the ending of the first verse – the part that goes, “… and I say to myself, what a wonderful world.” – would work well. I wanted this “intro” to be a chord melody style and here’s what I came up with:
Let’s give this “intro” a listen:
Well, we’ve been through all the sections of “What A Wonderful World” and now the real work begins! Practice, practice, practice until the chord changes come naturally and our fingers fall into place without having to think too much about it all. I certainly do need more practice. Anyway, here’s the complete arrangement from the very start of the song down to the sweet “Oh yeah!” finish:
And, as an added bonus, here’s my humble attempt at playing “What A Wonderful World” in its entirety. This time through I’ll be playing the “intro” and verses finger style. I’ll also be playing the chorus with my fingers, but I’ll primarily be strumming and will be leaving out the “Blackbird” licks this time through. That’s the nice thing about this and most other songs… there’s really no set rule that says that you have to play it one particular way or play it just like someone else. Best thing is to do what sounds good to you and what is within your capabilities.
In closing, I just want to repeat what I said at the end of my previous lesson, that arranging this tune was has taken a lot of time and effort, but again it was well worth it. I’ve learned a great deal by doing this, and the end result is very personally satisfying and rewarding. I’m confident that I’ve got lots more arrangements in me just waiting to come out.
Making a lesson is as much work as, if not more than, the actual arrangement itself, and again really makes me appreciate how fortunate we all are to have Guitar Noise and all the writers here who take the time to help make all of us better players. Thank you again for that, Paul, David, and everyone! I’m happy to be able to contribute to this wonderful organization.
And, as always, please feel free to post your questions and suggestions on the Guitar Noise Forum’s “Guitar Noise Lessons” page – I do follow that forum and will be happy to read your comments or answer your questions. You can also email David directly at [email protected]. David has been good at forwarding comments that you may want to make to me.
Until next time,
Hank Stupi
joseph
January 16th, 2012 @ 10:13 pm
This was very useful. A simple but rich arrangement very fitting for this song. Beautiful… Thank you very much for writing this!