Preparing To Climb – or, So I Know A Scale. Now What?
In some of our earlier columns, we’ve covered various aspects that you probably want to know should you desire to learn how to solo and improvise. Moving On Up showed us how we could move three basic chord shapes (E, D and A) up and down the neck in order to form new chords. Scaling The Heights introduced us to the two scales – the major scale and the pentatonic scale – which are the cornerstone of most soloing work. And our last column, A La Modal, hopefully demonstrated to you that knowing one major scale means knowing seven different modal scales.
Today we’ll take some of these elements and add a little more depth to them. We’ll also look at the ideas of structure and targeting. And since we’ve got a full plate anyway, what say we take a short look at bending strings as well?
These files are the author’s own work and represent his interpretation of this song. They are intended solely for private study, scholarship or research.
I’d like to do all these things by examining a solo that already exists. It’s a good idea to start out with a solo that fits the criteria I set forth in an old column of mine, Leading Questions, meaning I’d like it to be short, slow (relatively, anyway) and simple (again, not too simple – we should have a bit of a challenge, no?). And it’s singable, too! So I’ve called upon Lindsay Buckingham’s brief solo in the original recording of Fleetwood Mac’s Landslide, taken from the group’s self-titled album of 1975 to help us out. By the way, if you haven’t read Leading Questions, I heartily advise that you do so now! We’ll wait!
While learning to play leads by copying others’ solos is a time-honored practice, you can lose something by doing so. We can never go into Lindsay Buckingham’s head as he came up with this little lead, perhaps saying to himself, “Let’s use a Bb major scale!” anymore than we can say whether or not he put any more thought into it other than, “Hey! This sounds cool!” So we can never truly know how much of what we examine today was thought out beforehand back then. But that doesn’t mean that things like structure and motifs were totally ignored, either. Most professional musicians (not to mention non-musicians!) will tell you that good solos usually are structured like good songs.
So it’s up to you to understand the why of learning solos this way. And the chances are that the reasons will be different for each of you depending on where you are at this point of your guitar-life. Some of you may simply want to learn this one particular lead. Others may be looking to make that leap across the seeming chasm that exists between knowing a scale and creating an interesting solo with it. Still others may be interested in examining the use of bends to add more depth to your knowledge of scales.
These reasons, and others, are the difference between studying a solo and merely copying one. Just like I tell you in the various song lessons here at Guitar Noise, practically every bit of music you learn can be applied somewhere else. And while I can try to coach you in using the knowledge you gain, you have to open your ears and minds to the chances of doing so.
Back to the task at hand, this particular solo comes a little more than halfway into this particular song, serving as a brief interlude between two identical bridges:
Well I’ve been afraid of changing
‘Cause I’ve built my life around you
But time makes you bolder even children get older
And I’m getting older too
Landslide, on the original recording, is in the key of Eb. If you’ve read the lesson Laura Lasley and I wrote on this song, you already know that it’s fairly simple in terms of chord progression. The entire song, except for the first line of the bridge, consists of this two-measure sequence:
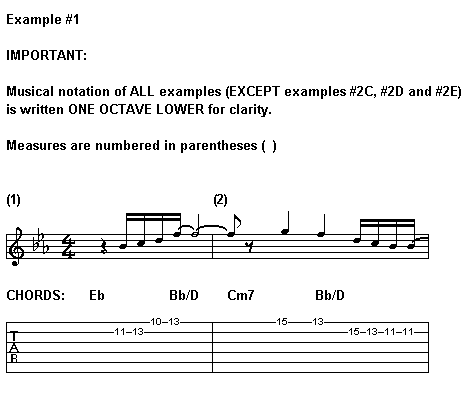
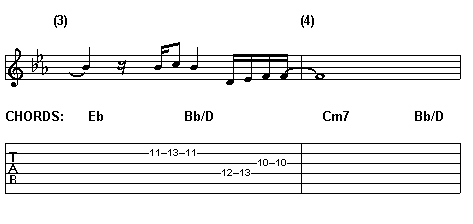
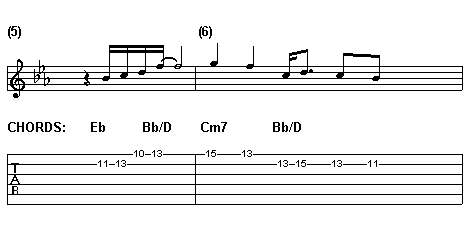
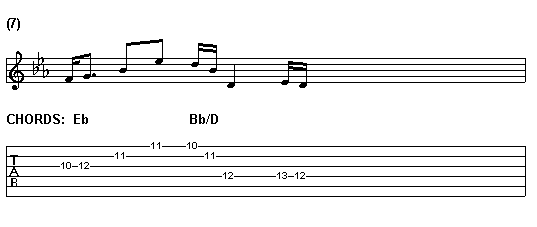
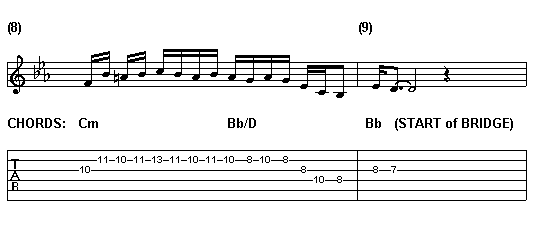
Buckingham plays his solo over four repetitions of these two measures and it ends when the bridge, which starts on a Bb chord, begins again. What I’ve done here is taken the melody of the solo and written it out for you:
This is the “no-frills” version of this solo. I’ve simply notated the notes of the melody and nothing more. By the way, if you’re one who’s interested in this sort of thing, on these MP3s I am playing a Fender Stratocaster with the “five way” selector on the neck pickup. The tone is as clean as I could make it.
Please make note of the fact that I wrote the notation of this lead an octave lower than the actual notation would normally be written. There’s a reason for this; since I want you to be able to make connections between the notes on the staff and the scales which we’ll be examining momentarily, I don’t want you to also worry about reading the notes way above the staff line. I hope this isn’t too confusing.
First, I’d like you to examine this in terms of structure. You can divide the solo into two basic sections: part one is the first four measures and part two consists of measures five through eight (and the first bit of measure nine, where the bridge begins again). Right off the bat in part one, Buckingham uses a rhythmic motif, playing a set of four sixteenth notes, the last of which is held for an additional few beats. He uses this motif in each measure of part one, except the fourth measure where he’s simply holding on to the note that ended the final motif for the entire four beats. Just where did these notes come from? We’ll get to that in a moment.
He starts out the second half of the solo, in measure four, almost identically. Measure four is, note for note, identical to measure one except the last note doesn’t spill into measure five as the last note of measure one is tied into the first half beat of measure two. So we start out measure five on the first beat instead of the second (as we do in measure two). It’s a subtle difference, but it’s definitive signal that we’re planning on not simply repeating ourselves.
And we certainly don’t! While the notes of measure five are the same, Buckingham deliberately alters the rhythm and plays around with it in measure six before going into pretty much a whole measure of sixteenth notes (measure eight) which closes out the solo.
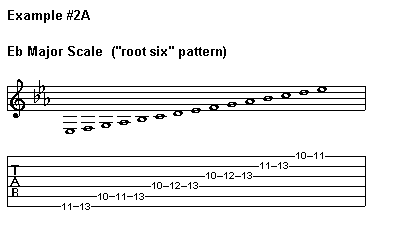
Having looked at the structure, let’s now look at the notes. As mentioned, the song is in the key of Eb. In case you don’t already know, here’s the Eb major scale in what’s known as “root-six” position, meaning that the root of the scale (Eb) is on the sixth (low E) string:
And here’s where the wrinkle comes in – Buckingham doesn’t use an Eb scale throughout the entire solo. If you read music (and there’s no reason why you shouldn’t! Take a look at the article Your Very Own Rosetta Stone and see how easy it is to get started!), you know enough to look for accidentals in the notation. Accidentals are changes to notes, making them different from the key signature. If you look at measure eight, you’ll see a symbol that looks kind of like a mutated pound sign (#) in front of the third note, which is an A. This indicates that you want to play A natural instead of Ab, which is in the key signature. Accidentals always override the key signature and last for the duration of a measure.
Scanning through the entire solo I can also see that not only is the only use of an accidental, but it’s also the only use any A note (natural or flat) in all eight measures. All the A’s are natural and they’re all in measure eight.
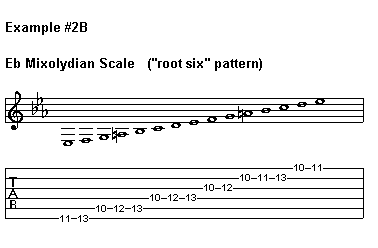
So what does this mean? For starters, it means I might want to rethink using an Eb scale and instead use the Eb Mixolydian scale:
Here I have all the notes I need for this solo. Seriously. All the little motifs and phrases, as well as the long sequence of sixteenth notes at the very end, are just notes take from this scale. They are grouped into short, pleasant sounding melodies that are very much in character with the overall tone of the song. There is no magic formula when it comes to this.
But why would Lindsay Buckingham choose to use this particular scale? Again, there are several possible answers and I can’t begin to tell you which, if any, shaped his thinking. But let me tell you what I might guess, simply based on the evidence at hand.
To me, it’s a matter of what’s called targeting. Even though the solo takes place in a song in the key of Eb, it ends squarely on a part of the song that has momentarily moved to the key of Bb. The first line of the bridge consists of these two measures:
And then it goes happily back to repeating the two measures in Eb that we’ve been playing the entire song. And if we go back and look at the chords in of the rest of the song, you can see that they can fit in either the key of Eb or Bb:
So playing the notes he does in the first six measures of the solo, Buckingham really doesn’t have to worry about which scale he’s in as either will do. It’s not until measure eight that he commits to the Bb scale (or Eb Mixolydian, if you will), and that is because he wants to land squarely on a note of the Bb chord when the bridge starts. And, by choosing D, which is the ever-and-all-important third, as his final note, I think he gives it as good an ending as possible.
And I also tend to think of this scale more as “Bb” than “Eb Mixolydian” because of the notes he chooses to draw out, the F in measures one, three (and, consequently, four) and five and the Bb in measure two (which ties over to measure three). Because every other chord of the progression is Bb, it’s easy to kind of sneak the tonal center of the song that way.
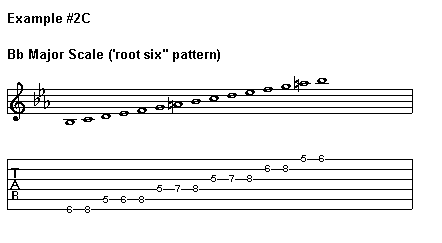
So let’s take a moment and look at the Bb scale, again in “root-six” position:
Well, that’s all fine and dandy, but it doesn’t come close to the tenth, eleventh, twelfth and thirteen frets, where all the notes of the solo seem to be. So what do we do?
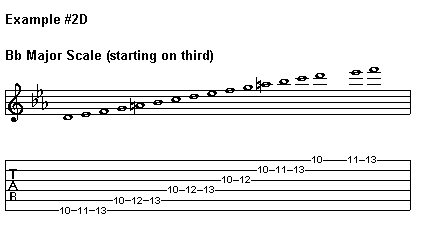
This is where our last lesson, A La Modal, comes in. We learned that scales don’t have to start on a root. We can start them on any note (also called the degree) of the given scale. For instance, we can start our Bb scale with the D note (the third of the Bb scale) on the sixth string:
This is why people will tell you that knowing your scale is only a first step, that you should also learn the various places on the neck where you can play it. Some teachers will find a scale position for each note of the scale. So, again using the Bb major scale as an example, you should be able to play a Bb scale with Bb (example #2C), C, D (as here), Eb (example #2B), F, G and A as your starting notes on the sixth (low E) string.
Why? You’ll notice, in this last example, that I added two extra notes (Eb and F) to the top. We’ll be needing that high F for this solo and I wanted you to see that they are easily within reach of the Bb scale, but only when we use the Bb scale which starts with the D (or Eb, as we saw in example #2B) on the low E (sixth) string.
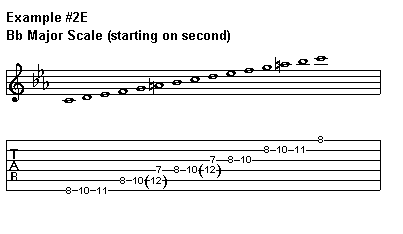
As I mention, we can use any note as our starting point. Let’s look at the Bb scale starting on the C note, which is the second degree of this scale:
The TAB notes in parentheses are optional places to play the same note. The A and D can be played on the twelfth fret of their repsective strings instead of on the seventh frets of the D and G strings. Which fingering you decide to use is truly a matter of choice, or of the size of your hand!
But what I want you to see is that, in both these last examples, we’re more into the area of the neck that Buckingham uses for his solo and we haven’t changed our scale at all, merely the scale’s position. In fact, for this solo I’m thinking on using these two positions of the Bb scale.
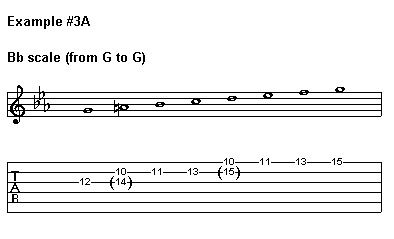
But how can I do that when the second measure has a note on the fifteenth fret? This is where bending comes into play. We’ll be devoting a whole column in the (relatively) near future on this, but for now you might want to brush up on the subject in the old column, Tricks of the Trade. You can use bends, particularly “full” bends, which raise the tone of the string one full step, to condense, or expand, your scale. Here’s an example of what I’m talking about:
I’ve taken a segment of the Bb scale, going from G to G (and the music notation (not the TAB) is back to being an octave lower for clarity) and written it out in TAB. This is the area where most of the solo is played. In the first example you can see that whichever fingering you use, you will have some big stretches to deal with. As a rule, you want to keep your solo played in a span that is comfortable for your fingers. A range of three to four frets is ideal. But we can’t get that here.
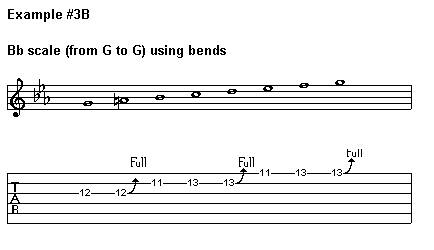
Unless we taking bending strings into account, as we do here:
In this scale, I’ve eliminated the use of the tenth, fourteen and fifteenth frets by using full bends at various points in the scale. This frees my fingers from having to make awkward stretches.
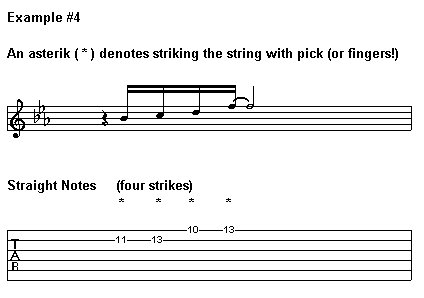
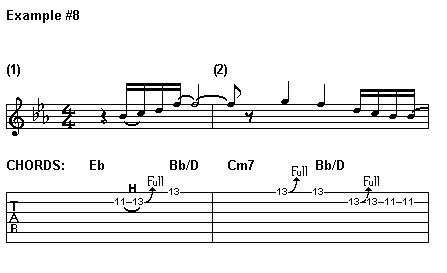
And bending also allows you to give your guitar more of a voice; it allows it to sing. This isn’t going to be the easiest thing to demonstrate but allow me to try by looking at the very first phrase of the solo:
Here I’m playing this four-note phrase in four different ways. First, I play it “straight,” that is I strike each note once. And if you’re wondering how I’m getting the tone I do, I’m taking a page out of Lindsay Buckingham’s book and I’m not using a pick! That’s right, I’m playing all these MP3s with my fingers! First I play the Bb (eleventh fret of the B string), then the C (thirteenth fret), then the D (tenth fret of the high E (sixth) string) and finally the F (thirteenth fret).
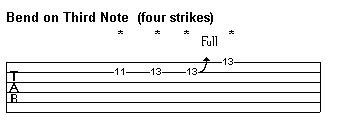
I also strike with my fingers four times during the second time I play this. But on the third note, the D, instead of fingering it on the tenth fret of the first string, I strike the C note (thirteenth fret of the B) a second time and bend that note up a whole step to get the D. Then I strike the F note.
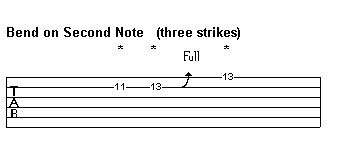
The third time through I only strike the C note once. I start on the Bb, then pick the C, wait a brief moment and then bend it up to D before striking the final F.
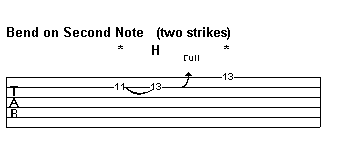
And on the fourth time through this phrase, I only use my fingers twice to strike the strings. I play the Bb first, as I’ve done each time, but then I hammer-on to the C note at the thirteenth fret and then bend that to get the D note before ending with a strike of the F note.
Each of these ways has its own voice and charm. I particularly like the last one because it seems to me like someone singing in one breath, but by hanging on to the bend (which, bended, is the D note) you get a nice harmony between the D and F.
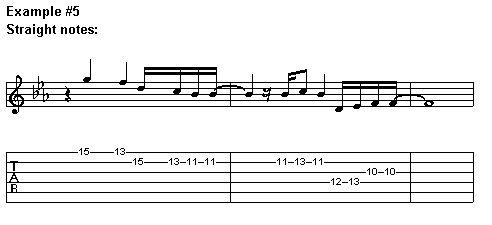
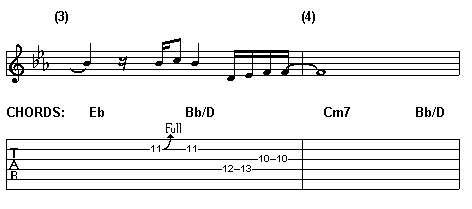
Which notes you decide to bend is totally up to you. Listening to the solo, I find more and more places to stick in a few, such as here during the second and third measures:
It’s important to play around. Find what notes, if any, you feel comfortable about bending. Find which fingers work best for you. In this example, I’ve indicated the fingers I use, but there are certainly other ways of doing it. The main thing with example #5, for me, is using my middle finger for the note on the eleventh fret. This shifts my fretting hand slightly down the neck (“down” meaning down in tone, away from the body of the guitar), which makes getting the note on the tenth fret a breeze.
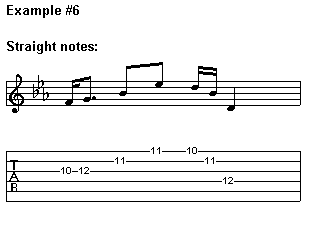
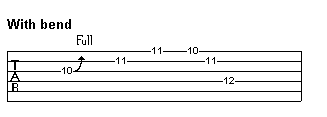
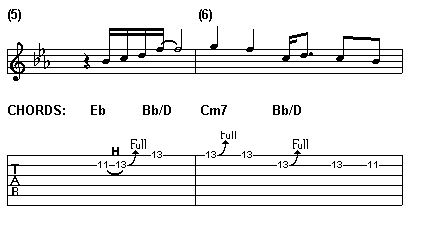
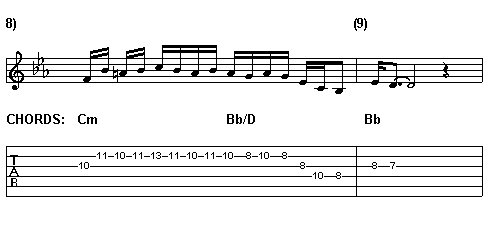
I want to take the time to point out what goes on in measure seven of the solo:
This bend is a little tricky in that you want to use your index finger to bend and hold the bend on the G string while playing the following notes on the B and high E (sixth) strings. This is a technique worth practicing, as you’ll find it used in all sorts of music, from metal to country, or “from Hank to Hendrix” as Neil Young might say. The reason that this is used a lot can be found in the “straight notes” TAB. If you look closely, you’ll see that the notes line up in the E-shape I described in Moving On Up. Using a bend to get the same shape creates wonderful overtones on the guitar. Most people will immediately think Little Wing when hearing them, but it’s a technique used across all genres and styles.
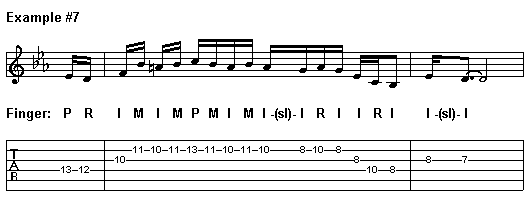
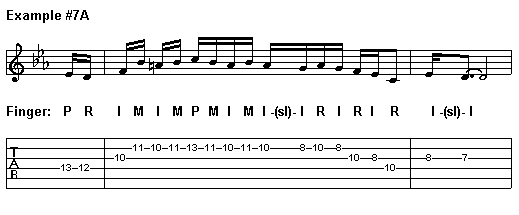
Speaking of most people, many folks may take a look at measure eight of this solo and then throw in the towel! They don’t realize that if they’ve gotten this far, all the hard stuff is already done. Whenever you’re confronted with a long series of notes, the best thing to do (and you know what I’m going to say!) is to take it apart and deal with each section slowly:
Here’s a clue: practice the scales I gave you at the start! Here we’re simply using portions of examples #2D and #2E. Where I put the “(sl)” symbol is where I slide (using my index finger) from one scale to the next. When I practiced this when I learned it, I worked first on the part up to the slide until I had it smooth. Then I worked on the second part. Finally I put them both together. One thing I found out while working out the second part was that I often would default to what I wrote out in example #7A. Not only that, but I kind of like that a lot better than the “original!”
Okay, after (and only after) you’ve taken each section by the horns and gotten it to a point that you’re happy, then put it all together. Remember to take it slowly:
And once you’re happy with the results of that (and don’t fret about mistakes – listen to how many I made!), then you can work up to speed:
I hope you had fun with this lesson and that it whets your appetite for trying out a lead or two. We’ll take the time every other month or so to examine more leads as well as to create some of our own. I think it’ll be fun. Hopefully, you will, too!
And, as always, please feel free to write in with any questions, comments, concerns or songs (and/or riffs and solos) you’d like to see discussed in future pieces. You can either drop off a note at the Guitar Forums page or email me directly at [email protected].
Until our next lesson…
Peace
