Timing Is Everything – A Guide To Reading Musical Notation – Part Two
Many people think that reading music is complicated. It truly is not. A piece of music itself can be complicated, but reading music requires fewer skills than reading any language. If you can count up to sixteen and have the capacity to divide things into twos and threes, then you can read music.
Music notation is a magical language. In Part 1 of our study, Your Very Own Rosetta Stone, we learned how to read the notes on the staff and to determine how those notes corresponded to the notes on our guitars. But every note of musical notation actually tells you two specific things. Not only does it tell you the name of the note, it tells you the note’s duration, or rather how long it should be held. This is the timing of the note.
At the beginning of a piece of notation, as we saw, the staff will give us important information regarding the song. The first thing is the clef. For our purposes today, we’re going to concentrate on the treble clef. You remember, from Part 1, that there is the treble clef (or “G clef” because it looks like a stylized “G”) as well as the bass (or “F”) clef. Since our examples will be for the guitar, let’s use the treble.
Immediately after the clef comes the key signature. This, as we learned, tells us what key the song is in by pointing out the number of sharps or flats, or if there are any.
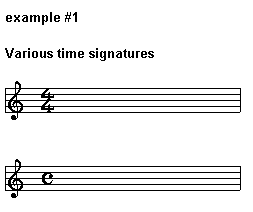
Following both these is the time signature. More often than not, this consists of two numbers sitting on top of each other, like a fraction. It could also be a “C” or also something that looks like the symbol for “cent” in American currency. If you’re playing most music, easily 95% of it will have one of these time signatures:
Rather than write all this out again, I’m going to borrow from one of my “Easy Songs for Beginners” lessons, House of the Rising Sun:
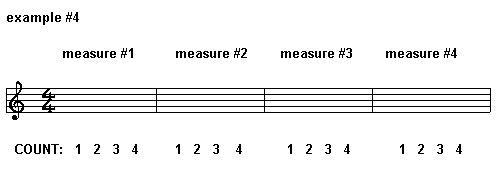
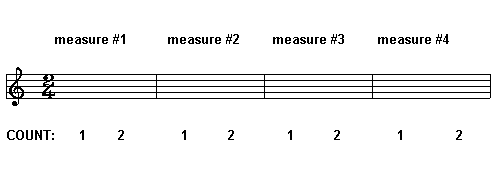
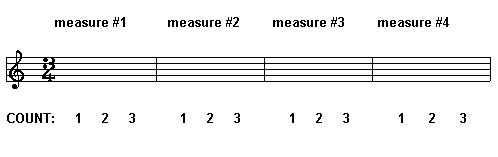
The time signature (along with the key signature) is one of the first things you encounter when you read music, so you might as well learn just what it means at some point, no? The time signature usually consists of two numbers written one on top of the other, almost like a fraction except there is no line (other than the lines of the staff and that doesn’t count). These provide you with two important pieces of information about the song that you are going to play. The top number tells you how many beats are in a measure (and we learned about measures in Before You Accuse Me). The lower number (the “denominator” if you will, the number that sits on the bottom) indicates which note is going to count as “one beat.” The vast majority of music you are likely to encounter will be in 4/4 timing:

Sometimes you will see “4/4″³ timing written out as “C.” I have no idea where this “shorthand” notation came from and would be more than happy to entertain suggestions. As well as “C” there is also a “C”with a vertical line slashing it. It looks like the symbol for a penny and, of course, my keyboard does not have one! This is known, appropriately enough, as “cut time,” or

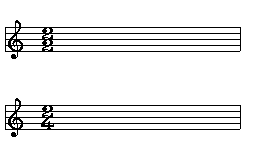
There are also songs, many marches in fact, which are in 2/4 time. And you have undoubtedly heard songs that use 3/4 timing as well. Waltzes are in 3/4:

Probably eighty-five to ninety percent of all songs are written in either of these two time signatures. 6/8 timing is very similar to 3/4 in that it has the same kind of “triplet” feel. It’s easier to count in groups of threes rather than sets of six, isn’t it?

I realize that, at this point, you have no idea as to what a “quarter note” or an “eighth note is. Don’t worry about that for the moment. First, let’s define a measure! “Measure” and “bar” (as in “twelve bar blues“), in case you’re wondering, mean the same thing. In music notation, and in many TABs, a measure is indicated by a single vertical line that crosses the staff at numerous points in a piece of music. Here’s what they look like:

There are two additional types of measure lines. A double line at the end of the song indicates (big surprise here!) the end of the song. Would I lie to you? Another symbol is the “repeat sign” which indicates you are to repeat a section of a song:
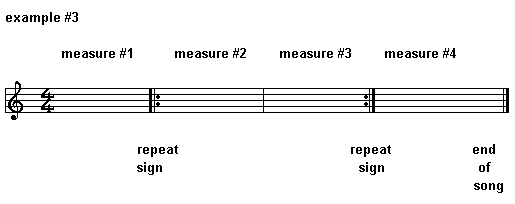
If you were playing this example, you’d first play measures one through three. When you came to the repeat sign in measure three, you’d go back to the first repeat sign in measure two and then play measures two and three again. Then you’d finish the song with measure four. In other words, you only repeat what is within the repeat signs. Notice that the double dots show you which way to go! If you ever run across a situation where there is no first repeat sign, you’re expected to go back to the beginning of the song.
Within each measure, you will have the number of beats indicated by the time signature. If there is a change in this value, which, although very rare in most music you will deal with, can happen, a new time signature will appear to let you know. Check out the lesson on Bookends or Blackbird if you’d like to see examples of this.
And while I’m trying to cover every conceivable thing, let’s talk about counting and keeping tempo. You may not believe this, but keeping a steady beat while playing is more important that I can possibly begin to tell you. So when we talk about the number of beats in a measure, it is absolutely vital that you make the beats uniform. Not only within the measure but also throughout the song, unless we run into one of those exceptions we’ve talked about. Practice counting beats aloud if you’ve never done so before. Yes, you’ll sound fairly daft simply saying “one, two, three, four,” over and over again to yourself, but no one said being a musician wasn’t without painful sacrifice. Are you ready to look at our time signatures from the first example and count along a few measures of them?

Still with me? Great! Let’s look at some notes. For the sake of simplicity, let’s work in 4/4 time and use a single note in order to demonstrate differences in timing. In the following example, all of these notes are the B note that corresponds to the open B (second) string. However, they are all different, as you’ll see.
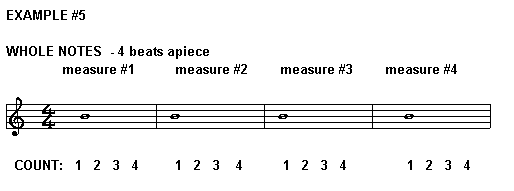
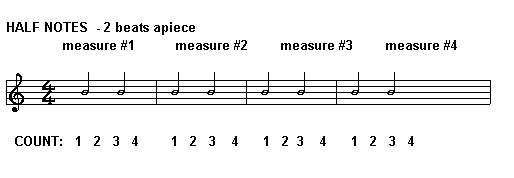
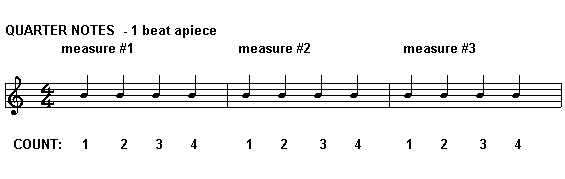
An important thing for me to point out here is that the “stems” of the notes (except, of course, on the whole note, since it has no stem) can go down instead of up. If you look at any piece of music you’ll see this. For the classical guitarist, as well as others, there is a special reason for this, and we’ll get to that in our next chapter.
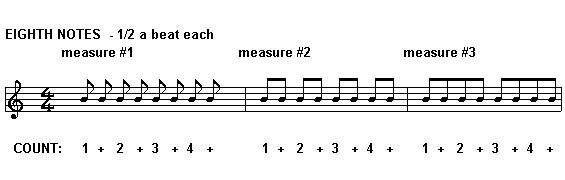
When you reach the line of eighth notes, notice that there are different ways of writing these out. First we see the notes individually – each note has a stem with a single “flag.” In measure two, I’ve connected the flags of each pair of eighth notes, grouping them into a single beat. Measure three shows the eighth notes grouped in sets of fours. This “grouping” can be done in many ways. I could string all eight together if I wanted to.
Likewise, when you see sixteenth notes and thirty-second notes (not shown here – they look exactly like eighth notes except that they have two and three flags, respectively, on the stem), they can be portrayed individually or in groups. Again, we’ll learn more about these (and triplets) next time.
Okay, just to make your life interesting and to show you there’s nothing at all to this, let’s see some notes in action. And before you get all worried that you can’t handle it, let me add that I’ve selected the first part of Twinkle, Twinkle Little Star (soon to be seen in a (bad pun alert) starring role in an upcoming lesson on arrangements for single guitar!) as our first example and Happy Birthday as our second. By the bye, I’m not throwing in the lyrics, just the count. If you truly need the lyrics, ask the first child you see.
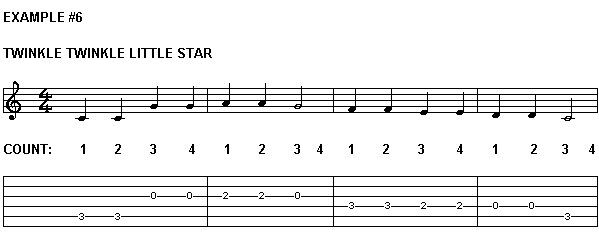

Twinkle, Twinkle, I imagine, gave you no trouble at all. Four quarter notes to a measure is a pretty easy way to start, right? And in measure two, you caught on to the fact that you had two quarter notes (one beat each) and a half note (two beats), which adds up to four beats, right? See how easy this can be?
Easy, that is, until I sprung Happy Birthday on you. I can hear you now – “The first measure only has ONE beat!!!” Well, if you managed to get to the last measure, you probably found it just as confusing to see that it had only two beats. And I know you read the 3/4 time signature correctly, so what gives?
This is what’s called a “pick up” beat. Some songs don’t start on the first beat; that would make things rather dull. This one begins with two eighth notes on the third beat. So, if you were counting things out for yourself, and if you gave yourself a full measure to set the pace, you’d go “one, two, three, one, two, Happy…” and launch into the rest of the song. The rest of the song is an easily figured combination of quarter notes, half notes and eighth notes. It’s nothing you can’t handle. The last measure is only two beats because we’ve used the third beat as our pick up beat. Think of it as all that matter/energy stuff that I didn’t understand in physics. We have to have the three beats somewhere – we’re just splitting them between the opening and the closing of the song.
So what happens when you’re not playing? This is called a “rest.” All rests have symbols which, just like the symbols for notes, indicate different time durations. Here they are:

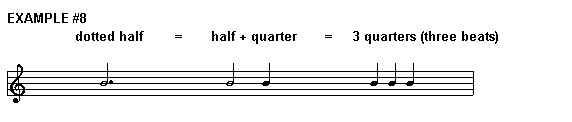
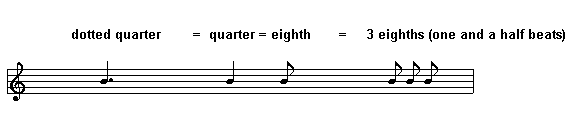
There’s one final thing I want to bring up to you in this lesson. You’ve no doubt noticed that the things we’ve covered quite a bit of material. But what happens if we want a note of a length other than what we’ve seen, like a note that is three beats long? How about a beat and a half? What about five or six or seven beats?
Notation has an ingenious way of dealing with this. It’s called a dot. Long before it was associated with the word “com,” the dot was an important part of reading music. When you see a dot after a note, you automatically add half of that note’s value to the note. As you see here:
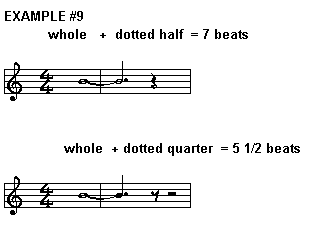
Another way of making a note longer involves the use of a “tie.” This is a slightly curved line, like a parenthesis that is lying on its side. It connects two or more notes and you simple add them together:
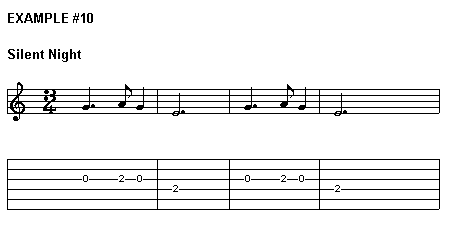
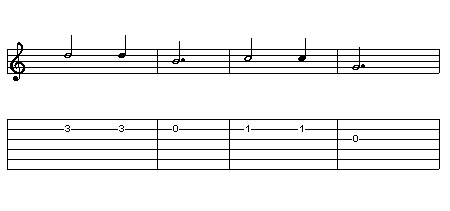
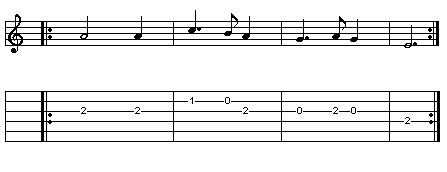
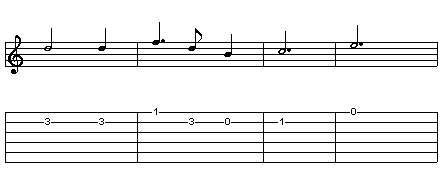
Let me leave you with an example that uses many of the things we’ve seen in this lesson.
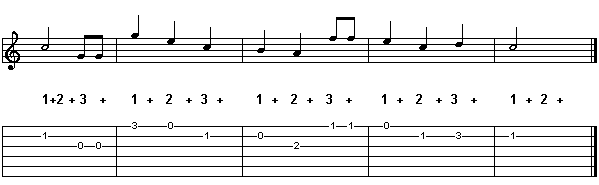
It’s Silent Night, which I’m certain you’re all familiar with. I’ve just written out the melody lines (even threw in the TAB so you can cheat if you want to!), and I took the liberty of writing in the key of C (no flats, no sharps) so that you can concentrate on learning both the note names and the timing:

Remember that all of this will not be instantly ingrained into your brain. The more you use notation, the quicker you will find you know what the symbols mean. You may not believe this, but spending five minutes a day looking at music will do you wonders. Take any beginner’s book or piano book and practice on the melody lines (the single note section usually at the top of a song) to familiarize yourself with notation. Learn some simple pieces, like Alan Green’s Study In Blue, which just went up onsite a week ago.
There are more things to cover in reading music notation, but what you’ve learned in these two lessons will provide you with most of the information you need to read standard notation. And hopefully the wait for “Part 3” won’t be anywhere near as long!
As always, please feel free to write in with any questions, comments, concerns or songs (and/or riffs and solos) you’d like to see discussed in future pieces. You can either drop off a note at the Guitar Forums or email me directly at [email protected].
Until next lesson…
Peace
Mr. Nice Guy
February 19th, 2016 @ 7:26 am
It’s called a G clef because the end of the the symbol crosses the G line in the treble.
Rajesh Gajjar
October 20th, 2012 @ 2:09 am
Good work to serve society the knowledge of music, I am sorry this is not good but BEST WORK.
Peggy Oehl
September 10th, 2012 @ 12:41 pm
The “C” means common time which is 4/4. It’s actually a broken circle which means common time or imperfect time. From the 16th century, a full circle would mean 3/2 or 3/4 time and was called perfect time.
The “C with a slash through it” means cut time which is 2/2 which means diminished imperfect time.
Staci
May 8th, 2012 @ 9:22 am
Hi. The ‘C’ representing 4/4 time means ‘Common time’, because 4/4 time is most commonly used.